14 DAY TRIAL //
 This article is also available in Spanish: Toma capturas de la pantalla al instante
All computer enthusiasts have their fair share of working with images. Whether we're talking about a new wallpaper that we want to adjust to fit our desktops or to enhance the photos we took during our last vacation, we all need to process images at some point.
Furthermore, there are users who deal with screenshots on a regular basis, for example those who design tutorials and need to take some snapshots of the application in action, and this is where LightScreen comes to the scene. This is a small utility designed to help users take numerous types of screenshots without much fuss. Plus, this tool is free of charge so, if you like it, you can use it for as long as you need it. Additionally, John T. Haller has created a portable version compatible with the PortableApps platform; in other words, you can take it on a portable drive and easily use it on any computer you choose.
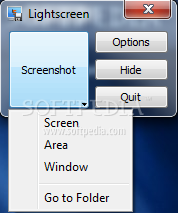
The main window of this tool will please you with its simplicity since it only displays four buttons. The Screenshot button will activate a drop-down menu that allows users to select the type of screenshot they need, more precisely one that contains the entire screen, a certain area or the currently active window. This menu also features the Go to Folder option, which will enable you to open the folder containing the screenshots you have already taken. The main window of LightScreen will permit you to access the Options section where you can customize the tool according to your preferences; additionally, you can employ the Hide button to send the program to the system tray or the Quit one to close it.
You will soon realize this tool does not offer a preview of the screenshot you have made and this will probably hinder the work of some users. In order to make sure the captured image satisfies your necessities, you will need to navigate to the designated folder and check every screenshot. This might make you waste some extra time and this is why it is one of the major drawbacks of the program.
Also worth mentioning is the fact that LightScreen does not come with any editing functions. Whenever you want to modify the images you have just grabbed, you will have to use a third-party tool. Still, you will need to keep in mind that this is a graphic capture app and not an image editing one. In other words, it does the job it was built for and nothing more.
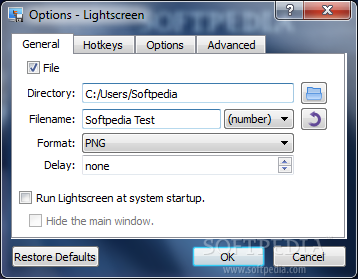
The Options window is definitely the most important one given the fact that it provides various levels of customization designed to ease your work when taking screenshots. First and foremost, you can specify the folder that will be used when saving your snapshots.
Secondly, you can set a default filename, which can contain a number or the current date. This will include the exact date that is displayed by your computer featuring the exact time at which the screenshot was made. In addition, you can set for the number / date to be placed in front or at the end of the chosen filename.
On the downside, you will not be able to disable the number or the date, so you will be forced to use one of them. However, this will prove to be quite useful if you generally take a lot of screenshots one after another because you might end up being confused about which was taken first.
The General tab will also enable users to select the file type. The available options are not very numerous, only the PNG, JPG and BMP extensions are offered. Nonetheless, this range covers the most used image file formats, so it probably satisfies average users. Those who expect or need more file types might be disappointed (for instance, GIF is one of the common formats not included in the list).
When the screenshot you need to capture is a little more complex and requires some previous preparations, LightScreen enables you to set a delay time. For example, if you want to take a screenshot of a screensaver you will first have to hit the Preview button in the designated window. Setting a delay time will help you obtain a perfect shot of the screen that interests you.
If you want to have LightScreen always at hand, the Options window will allow you to set for the application to run at Windows startup. And if you want to make sure it won't bother you in your work, you can choose for the main window to be hidden. To put it more simply, you have the possibility to easily access the application from the system tray, whenever you need it.
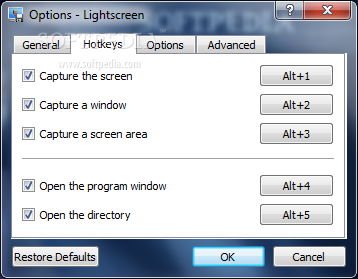
Moving on, those who enjoy using their keyboard more than their mouse will certainly appreciate the Hotkeys tab where they can create hotkey combinations that offer a quick access to the application’s functions. For instance, you can set a shortcut for capturing the entire screen, the active window or any chosen screen area. Furthermore, you can set a hotkey to open the image directory and one to access the program's main window when LightScreen is minimized to the system tray.
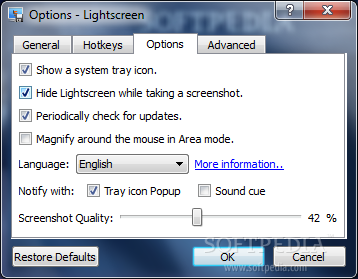
The Options tab will enable you to set the application to display an icon in the system tray so you can easily access it. You can set for the main window of the program to hide when taking a screenshot, so it won’t capture it by mistake, or to magnify around the Mouse when LightScreen is working in Area mode for increased precision. Needless to say, this application features the option to periodically check for updates so you can be sure you always use its latest version.
In order to make this tool accessible for everybody, LightScreen's developer offers a long list of supported languages. And, just in case you want to lend a hand, you can download a translation package in order to deliver your own translation.
This will enable you to select the way you want the program to notify you about the success of your action. You can select from a system tray balloon or a sound. You won't be able to customize this sound, so the default one will just have to do. One of the interesting things you can customize in this tab is the image quality. It is presented to you in a percentage form and, of course, goes from 0 to 100%.
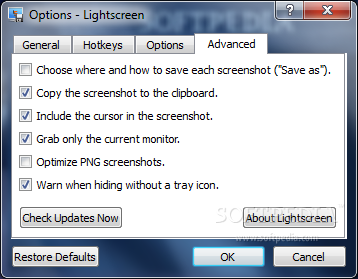
Last but not least, the Advanced tab will allow you to activate the Save As option, which basically overrides the selection of a pre-defined directory and will prompt you to specify the destination folder and to select the output file format after taking each screenshot. If this feature is disabled, the images grabbed will automatically be saved to the default folder that you have previously chosen. This will save time since you will not be required to manually pick a folder and filename every time you take a shot.
Moreover, you might prefer to save the screenshot to the clipboard if you opt for a copy / paste type of operation. LightScreen will also allow you to include the cursor in the snapshot and you can configure the software to function only on the current monitor if working with multiple monitors and you want to avoid confusions.
One of the interesting features this tool brings to the table is PNG optimization that actually refers to the size of the files. When this feature is activated, the images captured will have good quality, as well as a reasonable size. This might prove to be very important if you need to upload your images to a sharing website and you have a size limit. Truth be told, the tests we performed did not reveal a significant difference in size between the optimized and the unprocessed ones, but the optimization algorithm can be improved. The fact that the developer has considered including it is to be appreciated.
The Warn when hiding without a tray icon option will help you prevent hiding the main window of the program by mistake. In case you don’t remember the hotkey to bring it back, this feature will make sure LightScreen is not opened in the background without you being able to use it.
In a nutshell, this tool is very useful for those who require an image capture utility. It will enable users to take screenshots of whatever interests them, then save the files in some of the most used file types. Its ease of use and the fact that it doesn’t cost a penny will certainly encourage everyone to give it a try. However, since it doesn’t offer any editing capabilities, it is clear that advanced users might not want it on their computers but beginners will surely appreciate it. Its portability is also one of its strengths. It’s always nice to be able to take your favorite software with you, just in case you might need it.
The Bad The greatest drawback is the fact that LightScreen doesn't offer a preview of the snapshot taken. Having to take two extra steps just to be sure that the screenshot is exactly how you wanted it to be might prove to be quite disturbing. For users in need of a more advanced tool, some editing options would have come in handy. Another aspect that can be improved is the addition of a feature set to enable users to take exact size screenshots, for instance if you need a 110x120 photo. Here are some snapshots of the application in action:
The Good
The Truth