This launcher is intended to be a near 1-click tool for downloading, extracting, and compiling steps required to play the Super Metroid reimplementation (created by snesrev) on Windows.
- A legitimately obtained copy of the Super Metroid (US) ROM.
SHA256: 12B77C4BC9C1832CEE8881244659065EE1D84C70C3D29E6EAF92E6798CC2CA72
And that's it outside of this exectuable itself.
- Download the the latest release
- Unzip the file.
- Run
Super Metroid Launcher.exeat which point you will be greeted by a window that looks like this:
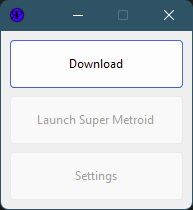
- Click the download button. If you happen to have a
sm.sfcfile in the same directory as the executable, it will copy it over automatically for you, but if not, a file selection dialog will open and allow you to select your ROM file (naming is not important). - The button will change from
Downloadto indicateDownloading...This will quickly pop up a number of windows indicating download progress. Once the files are downloaded, the button will change to indicateBuilding...at which point it may take up to several minutes to complete the process depending on your system. You will know the process is complete when the window looks like this:
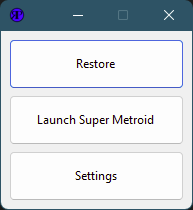
- Click
Launch Super Metroidand enjoy your time revisiting this classic natively on modern hardware.
The top button at this point should say Restore which will completely re-do the entire process again in case something was broken. However, as new updates are made to the sm repository by snesrev, the launcher will detect those changes and change the button to say Update. This will let you know if there has been an update to the Super Metroid reimplementation itself.
NOTE: There have been no updates since this functionality was programmed, so there is a chance it will not work. If you notice that it is not working, please let me know.
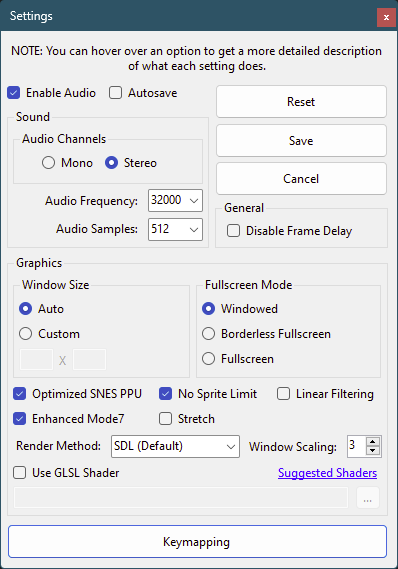
There are a number of settings available for you to change here. I will briefly explain them here.
- Autosave: Essentially a "sleep mode". Automatically creates savestates as you close the game and will restart you in the exact same place the next time you start your game.
- Window Size
- Auto: This will automatically size the window based on your selected
Fullscreen ModeandWindow Scaling. - Custom: Allows you to set the size of your window. The
Aspect Ratiosetting will still be respected, so if your window is not the same aspect ratio as that, you will end up with black bars.
- Auto: This will automatically size the window based on your selected
- Fullscreen Mode
- Windowed: This will provide you a window which can be move around your desktop. It's size can be changed via the
Window Scalingoption or using the assigned hotkey for increasing/decreasing the window size. - Borderless Fullscreen: This is still a window as part of your overall desktop, but it covers everything on a single monitor to appear as if it is fullscreen. This is generally considered the best performing option of the two fullscreen options.
- Fullscreen: The screen is fully in control of a given monitor.
- Windowed: This will provide you a window which can be move around your desktop. It's size can be changed via the
- Optimized SNES PPU: Use a more optimized but potentially buggy SNES PPU implementation.
- No Sprite Limit: No longer limits the number of sprites allowed to be rendered thus elminating flicker.
- Linear Filtering: Apply a linear filter to enlarged graphics. Results in a generally blurry image.
- Enhanced Mode7: Results in a higher resolution map.
- Stretch: Enabling this stretches the output to match the window size, this includes fullscreen modes, resulting a squashed or stretched visual. This can however be used to emulate a CRT since the 4:3 aspect ratio of a TV did not actually match the true 8:7 aspect ratio the SNES output.
- Window Scaling: Integer scaling of the display window. Only worked in
Windowedmode. - Render Method: Allows you to choose between SDL, SDL-Software, or OpenGL rendering. NOTE: This setting may be overridden when certain other options are selected if they require a specific renderer to be used.
- Use GLSL Shader: Allows you to select and load shaders to change how the visuals are rendered. A link is provided to a list of verified compatible shaders for you to select from.
- Enable Audio
- Audio Channels: Mono or Stereo
- Audio Frequency
- Audio Samples: Defaults to 512, but the larger the number the less cracking, but the longer lag between the audio and visuals.
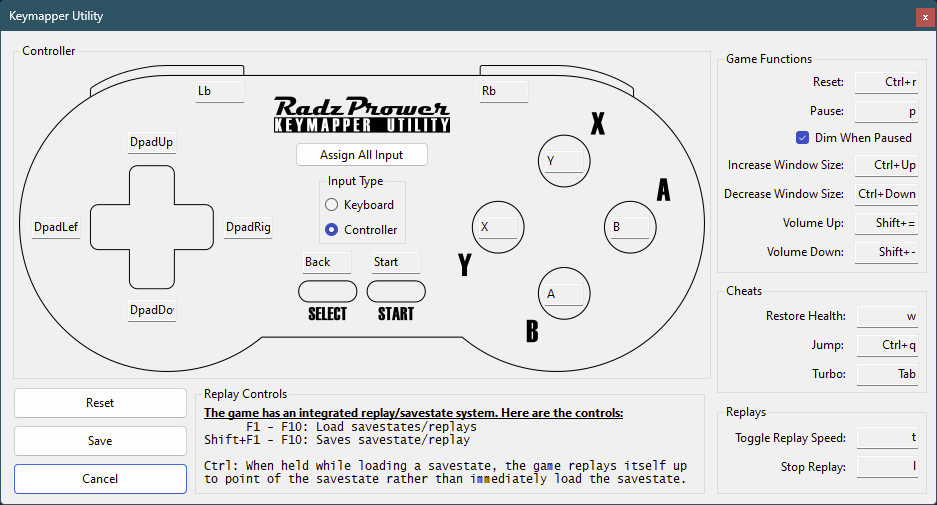
This utility allows you to set all the available standard controls (SNES controller) and additional hotkeys for sm exclusive functionality. The keyboard and gamepad settings are stored simultaneously for the main controls in the INI, so you must select which version you want to set for those controls specifically. The hotkeys however are unique so they can be freely set to either a gamepad or keyboard input.
You can hit the Assign All Input button to be sequentially moved from input to input so that you can set all keys without having to click on each individual input.
- Reset
- Pause: This pauses the game without bringing up the item menu.
- Dim When Paused: This toggles whether the screen dims when using the above pause function.
- Increase Window Size
- Decrease Window Size
- Volume Up
- Volume Down
- Restore Health: Full heal Samus
- Jump: Gives you a sort of Moon Jump
- Turbo: Increases game speed while held.
- Toggle Replay Speed: Toggles replay speed between realtime and turbo.
- Stop Repaly: Stops the current replay and you assume control of the game.