TrafficCamNZ Update – January 2024 3 January 2024
Posted by David Wilson in General.add a comment
Two updates for TrafficCamNZ.
1. The iOS application has been updated and is about to be released from the AppStore. It should appear in your application updates within the next 24 hours. The updates in this release (version 1.13.0) are:
● Stability and Performance improvements
● Minimum iOS deployment now iOS 13
● Support for Chromecast has been removed
● Map performance and useability is improved after removing some annimation
● Fixed up the settings display on iPad so it show now use the full height of the screen
2. A updated camera list has been processed and is available now… the application will automatically ask you if you would like to update sometime in the next seven days. This update includes a bit of a cleanup of cameras and a refresh of the camera list from the New Zealand Transport agency – there are a number of new cameras available.

I’ve also found a few things in TrafficCamNZ for macOS that I’d like to take a look at so be on the look out for updates in this area too if you’re running that.
– David
Moments release 14 July 2023
Posted by David Wilson in General.add a comment
Both Moments (v 1.4.0) for macOS and Moments Camera (v1.0.0) for iOS have been released.

Available here:
Moments: https://apps.apple.com/nz/app/moments/id1194414752?mt=12
Moments Camera: https://apps.apple.com/nz/app/moments-camera/id1621890031
 |
||
|
– David
Get ready for the iPhone upgrade to Moments 7 July 2023
Posted by David Wilson in General.add a comment
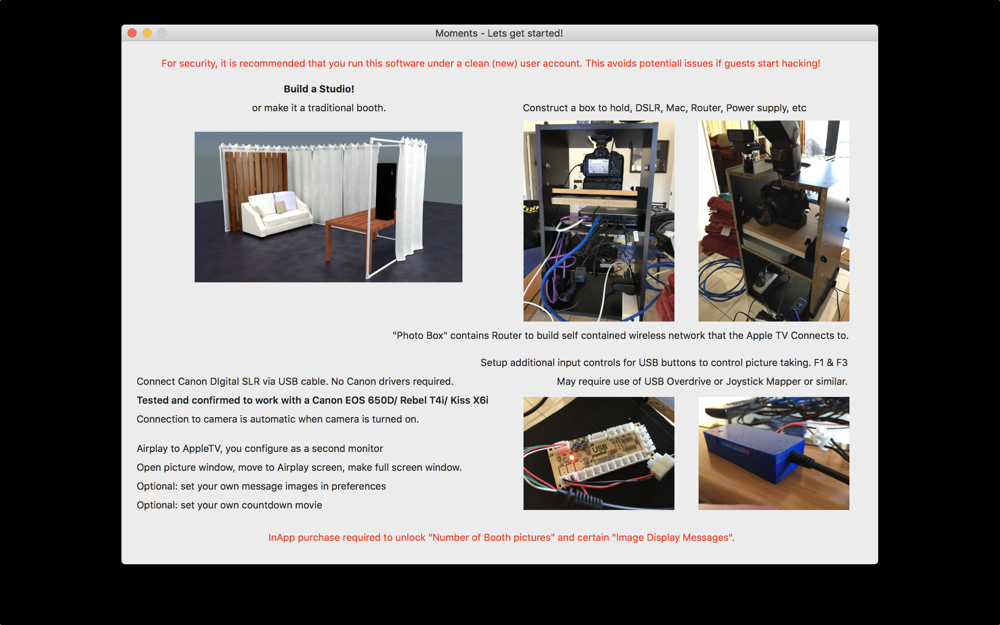
Moments for macOS is a modern day Photobooth that you can use at events to capture every special moment. Now with the companion application Moments Camera for iPhone.
Moments is the host where captured images are sent to and can display captured images on the “big Screen”. Moments can capture images from a DSLR or new in in version 1.4.0 from iPhone where you can have one or many iPhones. Apples MultiPeer Connectivity is used to connect the hardware running on the same network and for transfer of images to the macOS host.
The macOS Moments host and the iPhones need to be on the same network – you may need to establish a custom wireless network for your event that all devices connect to.

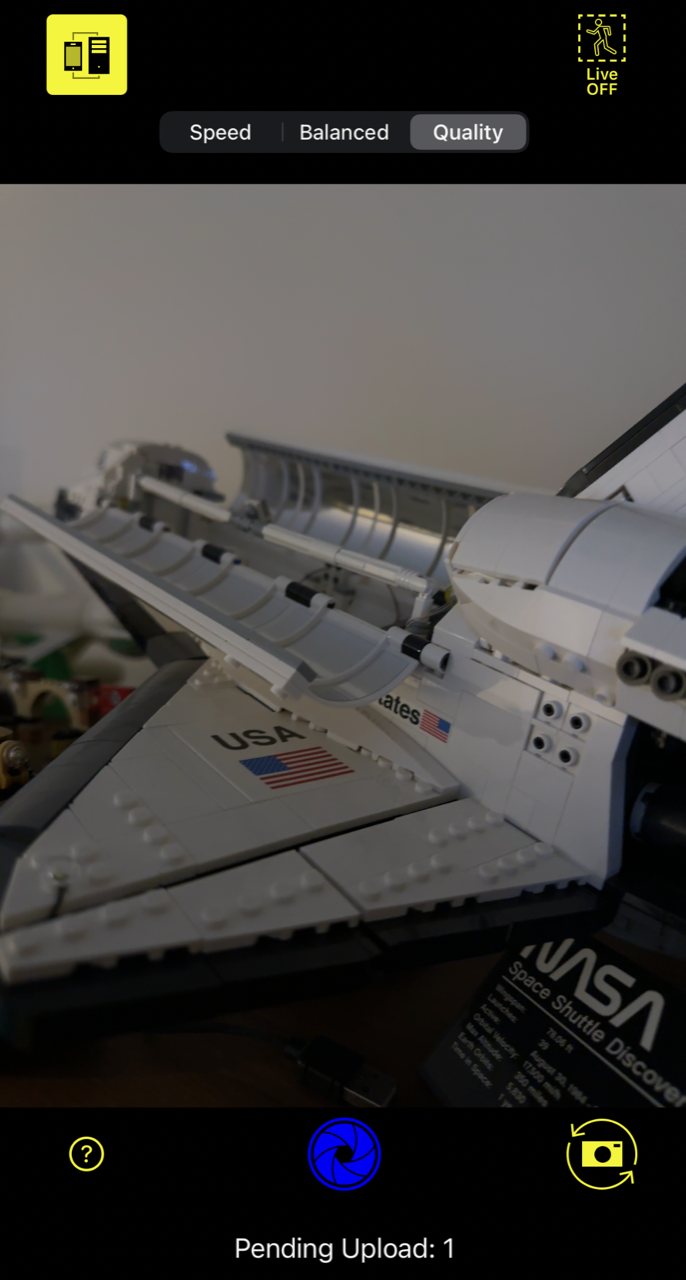
Taking a look at some of the features of Moments Camera:
Moments Camera on iPhone is used to capture Photos or Live Photos at an event, maybe a wedding or birthday party or even a corporate event. The shutter button at the bottom of the screen changes colour when connected to the macOS Moments host:
- Blue means we’ve connected to the macOS host running Moments for uploading pictures and the Moments host can also take pictures on the iPhone if we allow it.
- Red means that we have lost connection to the macOS host running Moments – reconnection attempts will be periodically attempted
The icons across the top of the screen provide a number of options:
- Host Connect – connect/disconnect to the macOS host
- Camera Flash – toggles on/off and automatic
- Click Ignore – when this icon is grey – CLICK or photo taking commands from the Moments macOS host are ignored
- Image Upload after application is backgrounded – when grey (not yellow) images taken when the application has been backgrounded are not uploaded
- Live Photos – when enabled LIVE pictures are taken – this causes a still photo and a short movie to be uploaded to the macOS host.
There are many enhancements to Moments for macOS and these are detailed below:
- Major enhancement providing an additional way to capture images with the iOS companion app – “Moments Camera”. Moments and Moments Camera utilise Apples MultiPeer Connectivity framework to community between Moments and Moments Camera for the quick transfer of images (still and live) from one or many Moments Camera applications. The user interface on Moments has been altered somewhat to accomodate this whole new method of capturing images at your events. You can use Moments for birthday parties or more formal events like weddings. You can even leave moments running all the time and have any impacts you take on your iPhone with Moments Camera automatically upload to the Moments host. See the builtin help documentation for more information.
- Added new Image preference setting to preserve the image apsect ratio when being displayed
- Recognises a connected iPhone (by wire) and loads camera images – picture taking with the iPhone is triggered across the network – you must use the “Moments Camera” iPhone application for this to work.
- Help has been updated – details on the new functionality, better help for the existing features, enhancements to the troubleshooting. Please make sure to have to read for tips and suggestions for running your PhotoBooth
- Added new preference setting to prevent images from being downloaded (default) when a camera is initially connected
- Connection to iPhone implemented wired and remote, use Moments Camera app for remote (wired and network) shutter control
- User Interface changes to accomodate “Remote” iPhones when running “Moments Camera”
- Fixed the menu item for “Image Display” – so that now works – also changed the cmd key codes for accessing the window menu items
- Fixed an issue with image preferences where entering numeric values was previously subject to some restrictions
- Fixed an issue with the Web Cameras window name – it’s now named in the list of windows displayed
- Moments is now a Universal Binary meaning it will run natively on Apple Silicon without Rosetta
- For those running an older Operating Systems for, please ensure you are running macOS (Catalina) 10.15.3 or higher. There was an issue (in ImageCaptureCore in the Core Image API) that prevented images being taken by a tethered camera via requestTakePicture – this was fixed in macOS 10.15.3
Version 1.4.0 of Moments for macOS and version 1.0.0 of Moments Camera for iOS will be released soon.
Version 1.3 of Moments for macOS is available in the Mac App Store today.
|
||
|
– David
-

- pastedgraphic 3
-
- pastedgraphic 2
David Wilson
https://dgwilson.wordpress.com
https://nz.linkedin.com/in/dgwilson65
Moments for macOS – Upgrade nearing end of development 6 May 2023
Posted by David Wilson in General.add a comment

It’s been sometime since Moments for macOS has been updated. Hopefully you’ll think it is worth the wait.
The major enhancement provides an additional way to capture images with the iOS companion app – “Moments Camera”. Moments and Moments Camera utilise Apples MultiPeer Connectivity framework to community between Moment and Moments Camera for the quick transfer of images (still and live) from one or many Moments Camera applications. The user interface on Moments has been altered somewhat to accomodate this whole new method of capturing images at your events. You can use Moments for birthday parties or more formal events like weddings. You can even leave moments running all the time and have any impacts you take on your iPhone with Moments Camera automatically upload to the Moments host.
Some field testing of the updated macOS and new iOS application Moments Camera has been undertaken with all of the feedback adopted. Development progress in the last few weeks has been productive and I’m hoping to complete further testing soon.
A complete retest with a DSLR and iOS connectivity and iPhone wired connectivity needs to be completed yet along with more updates to the various pieces of help. Then both applications will need to be submitted to Apple of the approval process.
– David
TrafficCamNZ – NZ Camera Update 23 December 2022
Posted by David Wilson in General.add a comment
A updated data file for TrafficCamNZ has been released.
It includes new cameras published by NZTA for Transmission Gully and the new SH1 bypass around Otaki.
Update the camera list when it becomes available and add these camera to your favourite list.
You can also change your preference settings to Predictive Mode or Auto Detect Mode to show the cameras around you.
-

- pastedgraphic 2
-

- img 0aff869455a0 1
Power BI – Maturity Model 27 June 2022
Posted by David Wilson in Power BI.add a comment
•Are you helping to improve the Maturity of Power BI Adoption within your organisation?
•Is there a method to the madness?
•How do you know if you are making progress – can you measure?
Microsoft provide the following guidance on adoption: https://docs.microsoft.com/en-us/power-bi/guidance/powerbi-adoption-roadmap-maturity-levels
Now that needs to turned into numbers that you can measure and see if you’re making a difference. That’s where the Power BI Maturity model comes in. As a team get together to assess each of horizontal categories – determine where you sit on the 1-5 scale – feel free to use point values or not. Then when you have worked through each category average up your answers for your measure. Use the bulleted examples in the columns as a guide to measure where you are. Hopefully you can complete a run through in 15 minutes… if you’re quick.
Repeat again in 3 to 6 months and hopefully you’re moving up.
ESP Relays – what a journey 22 August 2021
Posted by David Wilson in General.add a comment
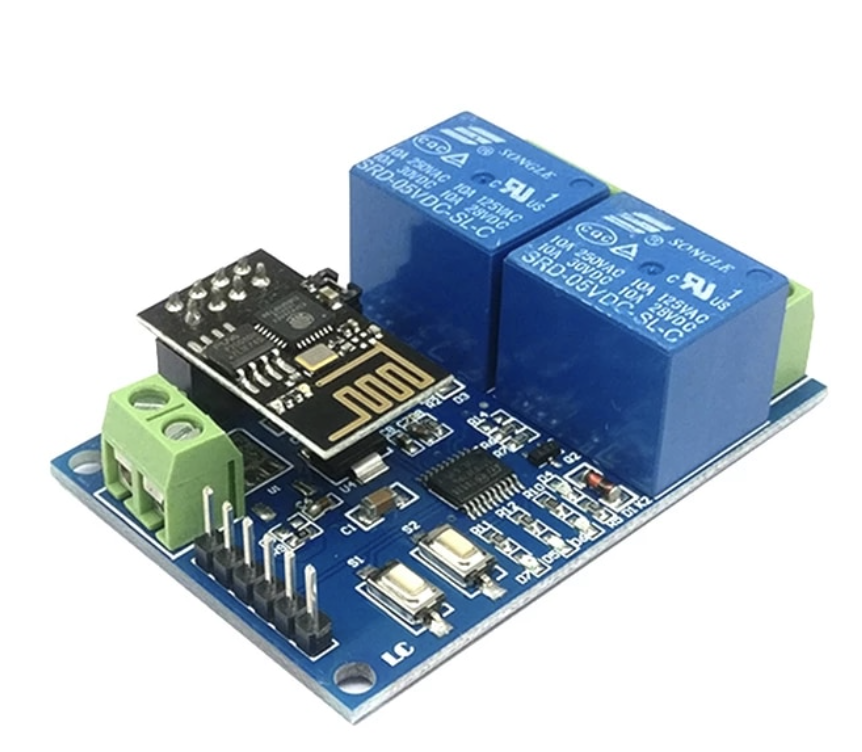
Trying to get some sort of control over this device has been not as straight forward as it should be. Others are going to encounter the same challenges that I did, you’ll come across the same web articles and fall into the same traps of confusion that I did. Below are my discoveries and learnings – with the resulting outcome being success, successful Home Assistant, and HomeKit integration along with the development of a brand new iPhone application that anyone can use (after release via the AppStore) to control the device.
If you’re on this journey too – good luck and I hope you find this useful.
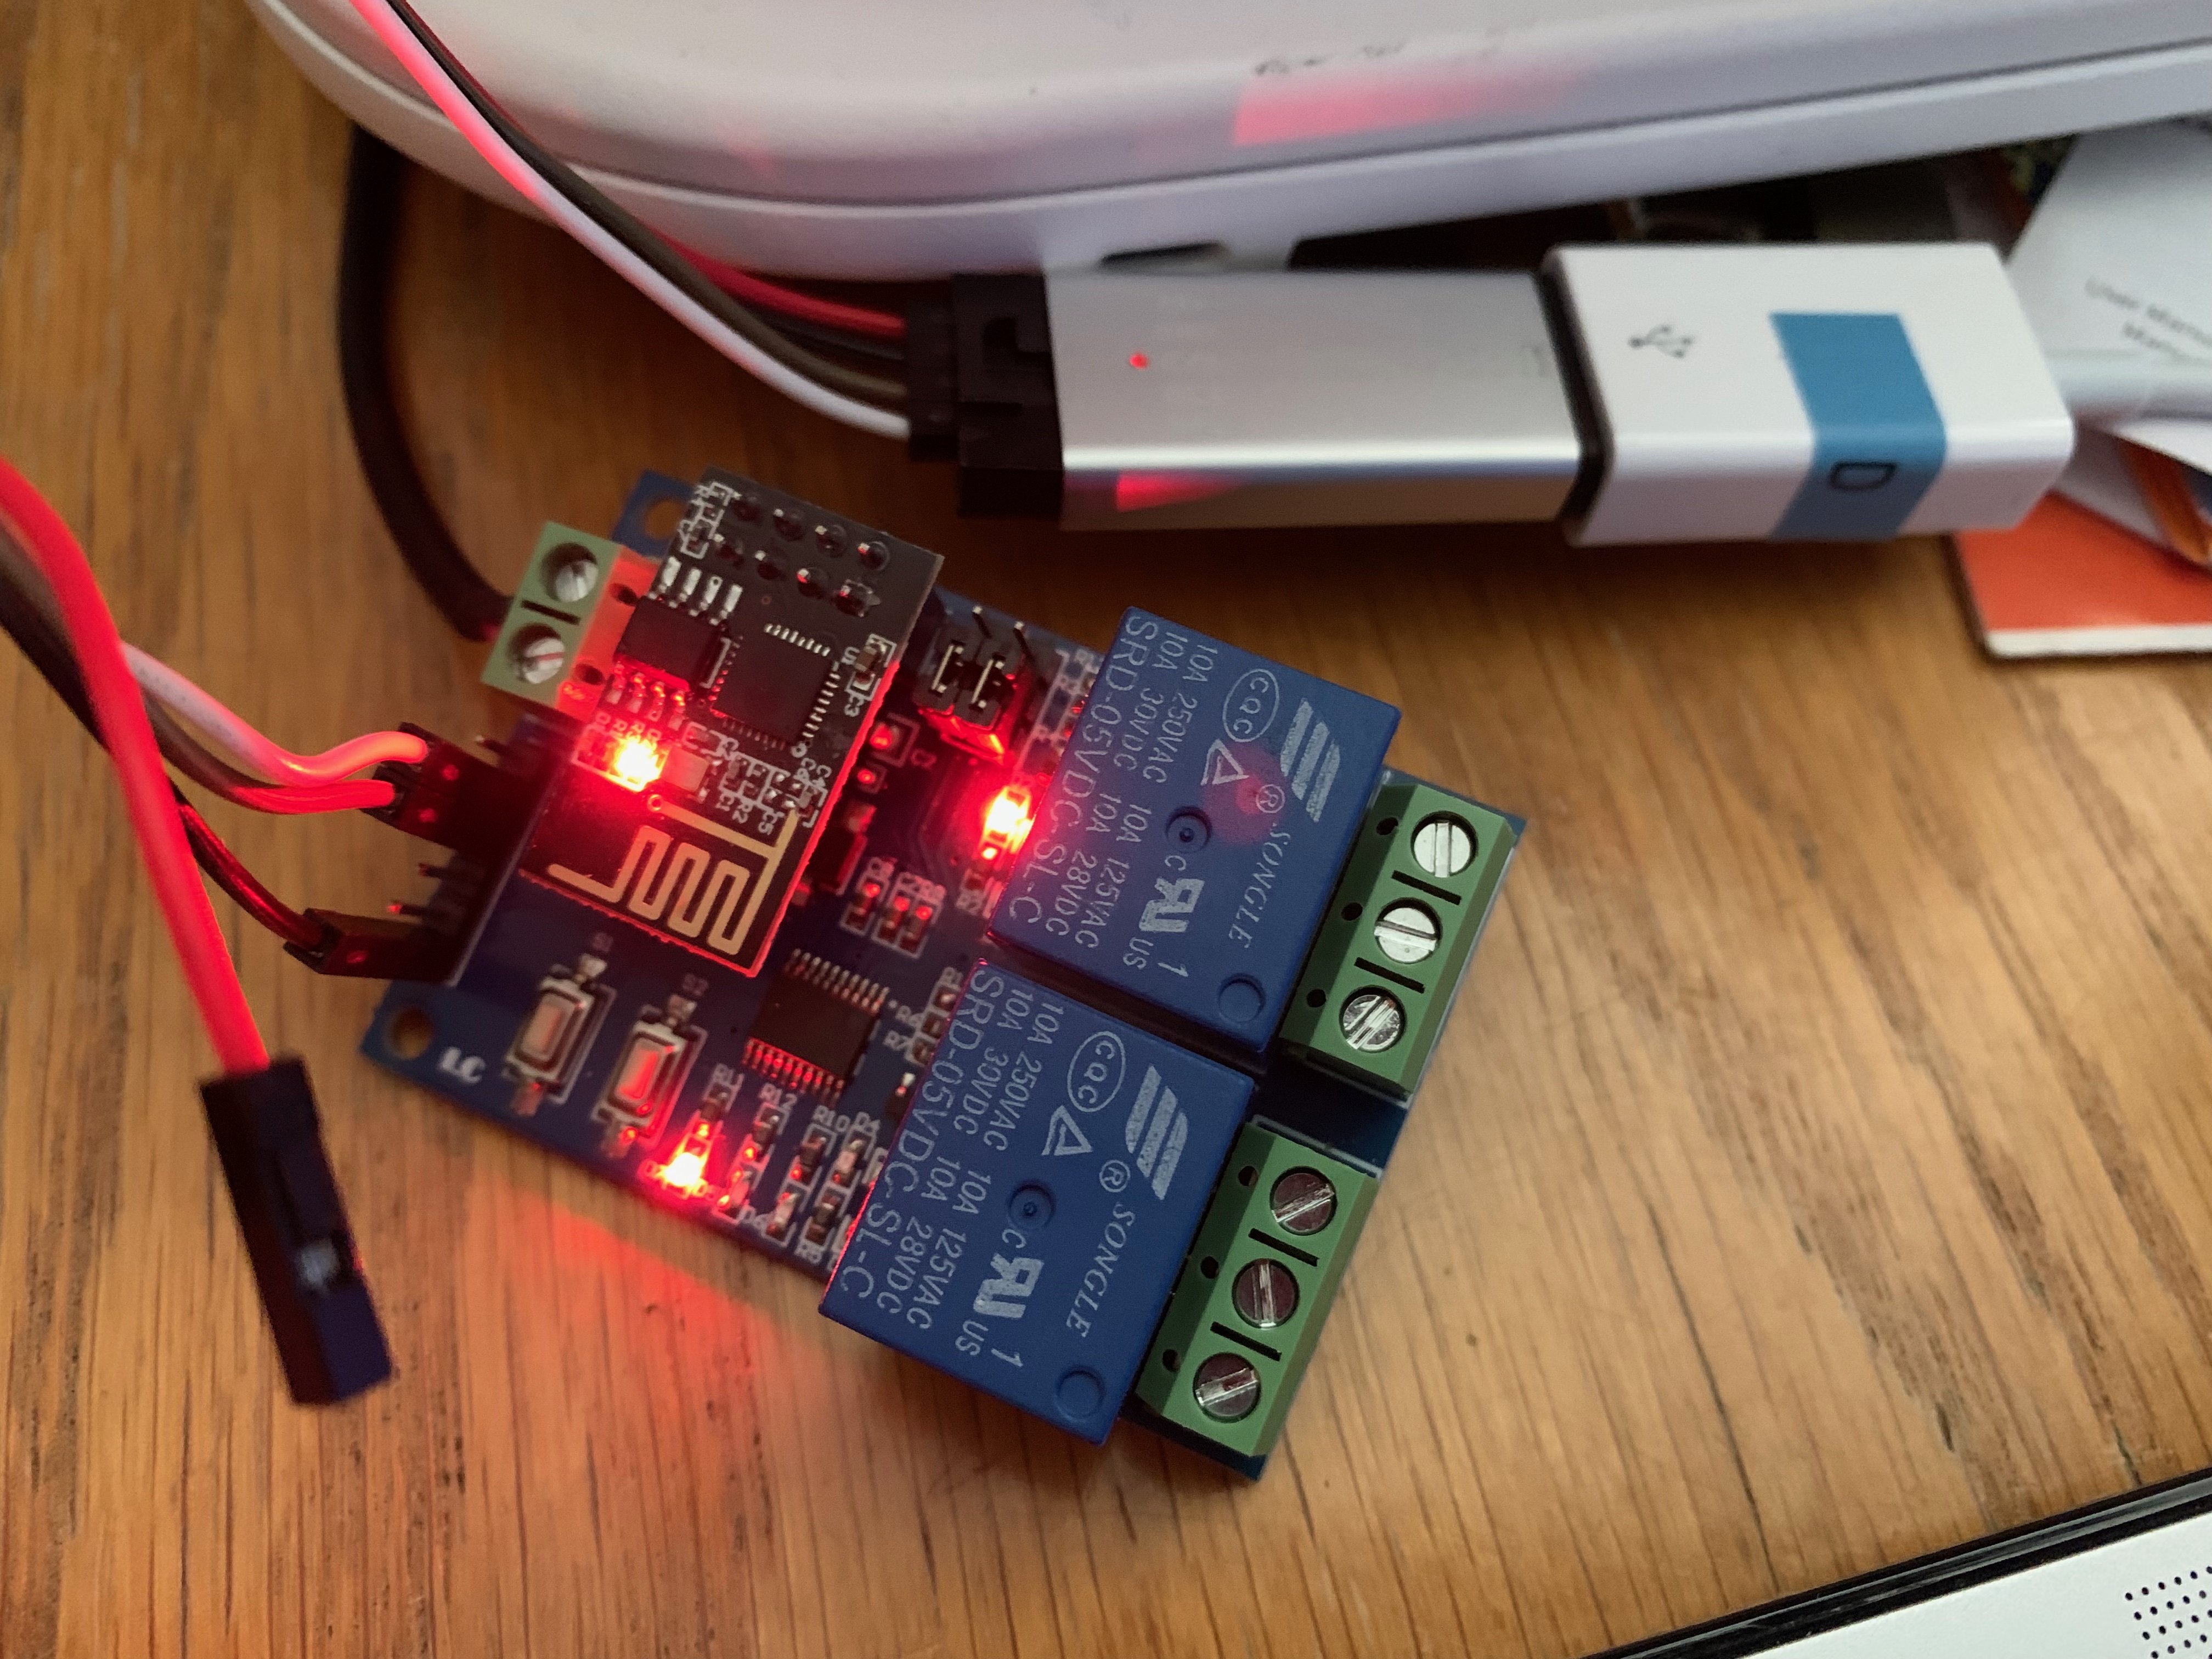
Here’s the device. 5V WIFI Relay Module ESP8266 IOT APP 2 Channel Remote Control For The Smart Home Phone Mobile Dual WiFi Automation Card Module.
https://www.aliexpress.com/item/33044184434.html?spm=a2g0s.9042311.0.0.27424c4daMLDlH
I’ve connected to the header pins using a USB to UART CP2102. – ESP32 CAM Module Support USB 2.0 To TTL UART Module 5v 3.3v CP2102 Aluminum Shell 5Pin Serial Converter STC Replace FT232RL
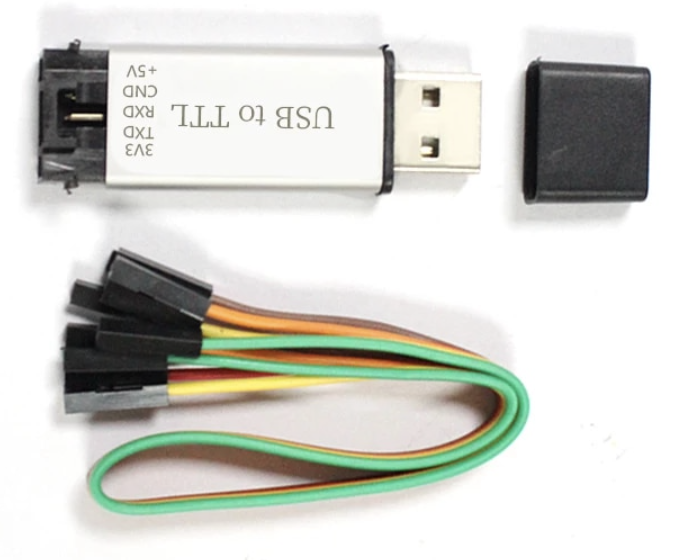
https://www.aliexpress.com/item/1005001947183190.html?spm=a2g0s.9042311.0.0.27424c4daMLDlH
Drivers for various Operating systems (if not built in) are available from here:
https://www.silabs.com/developers/usb-to-uart-bridge-vcp-drivers
I’m using macOS and iPhone – that shouldn’t be a problem. Though all web articles that show how to connect and use these things are Windows and Android. This is a link to a good example.
https://www.hackster.io/makerrelay/esp8266-wifi-5v-1-channel-relay-delay-module-iot-smart-home-e8a437
or the article below this product:
http://www.icstation.com/esp8266-wifi-channel-relay-module-smart-home-remote-control-switch-android-phone-control-transmission-distance-100m-p-12592.html
And this article:
https://manuals.plus/lc/lc-5v-2-channel-wifi-relay-module-esp01-manual
Importantly the first web article talks about different modes of the device and device configuration can be altered using AT commands. Here is the link to the AT Command reference manual:
https://www.espressif.com/sites/default/files/documentation/4a-esp8266_at_instruction_set_en.pdf
More information and downloads can be found here:
https://www.espressif.com/en/support/download/at?keys=&field_type_tid%5B%5D=14
Back to the Mac – I’m using a program from the App Store called Serial.
https://apps.apple.com/nz/app/serial/id877615577?mt=12
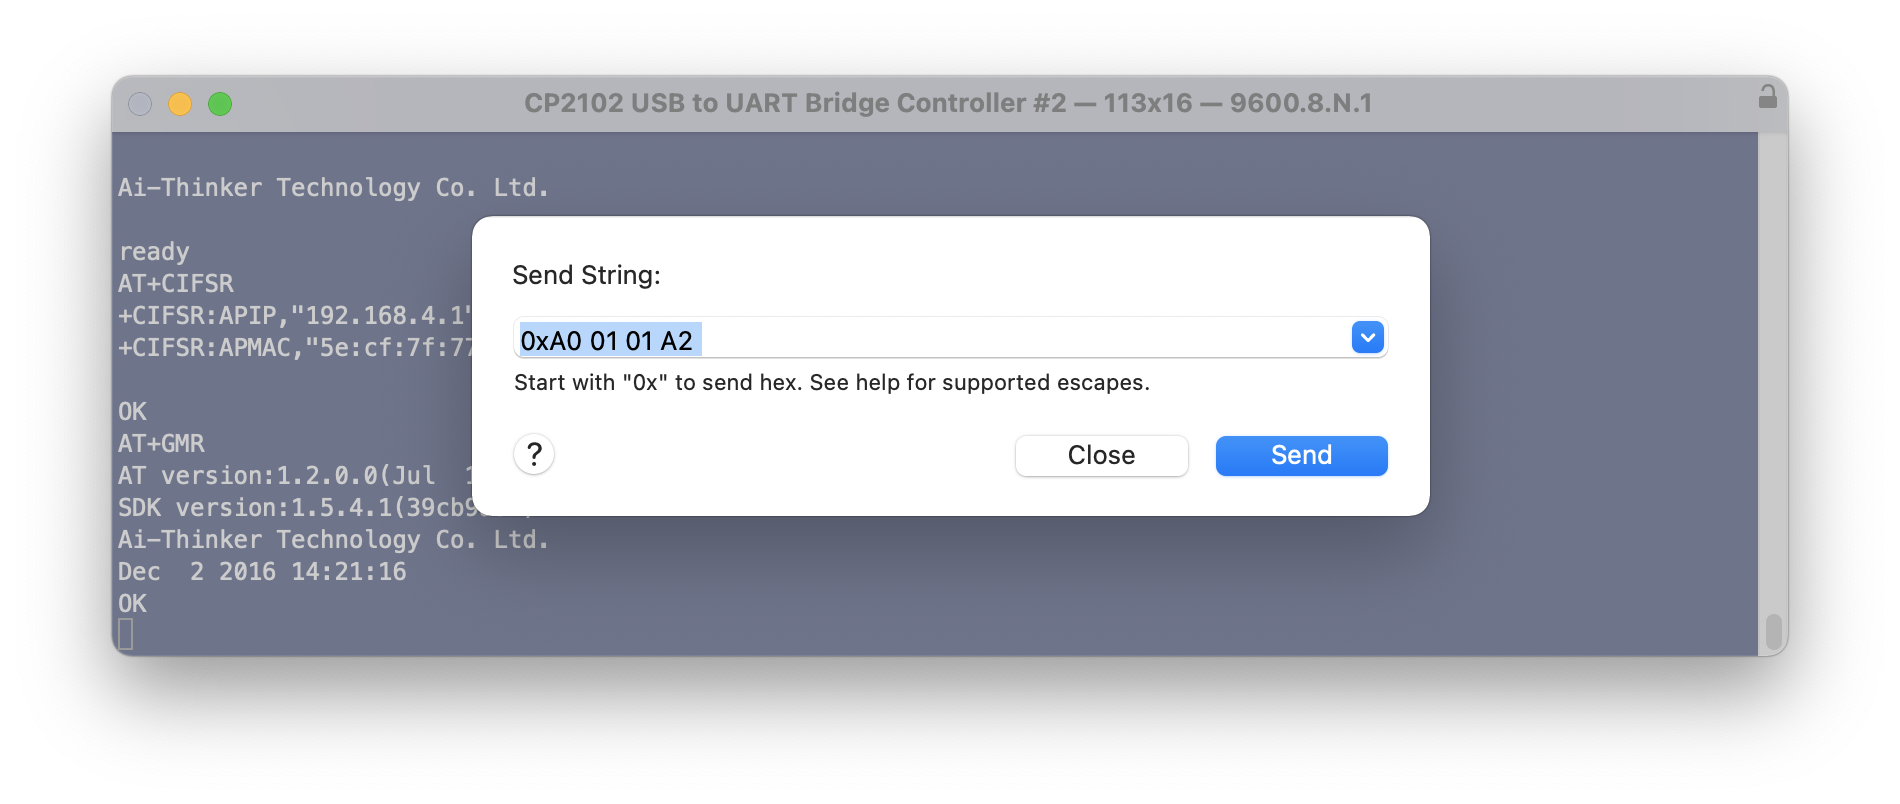
Ultimately we’re trying to send the following hex commands to the chip on the box (not the ESP) to control the relays.
Relay control command (must be hex format):
Open the first relay: A0 01 01 A2
Close the first Relay: A0 01 00 A1
Open the second relay: A0 02 01 A3
Close the second Relay: A0 02 00 A2
Open the third relay: A0 03 01 A4
Close the third Relay: A0 03 00 A3
Open the fourth relay: A0 04 01 A5
Close the fourth Relay: A0 04 00 A4
Taking a look at my stumbling journey… the key thing to remember is that any serial conversation is with the ESP01 running the AT Command set and that the ESP01 should be be passing through the hex control codes to the onboard chip for relay control. This is dependant on the position of jumpers on the board – my shipped in the default position of tx to tx1 jumped and rx to rx1 jumped. For my testing nothing was connected to the relays (they were not controlling anything).
Success: mostly
From the USB to TTL UART the following connections have been made to the header pins on the relay board:
GND to GND
TXD to RX
RXD to TX
And I had 5V supplied by a desk power supply to the power header.
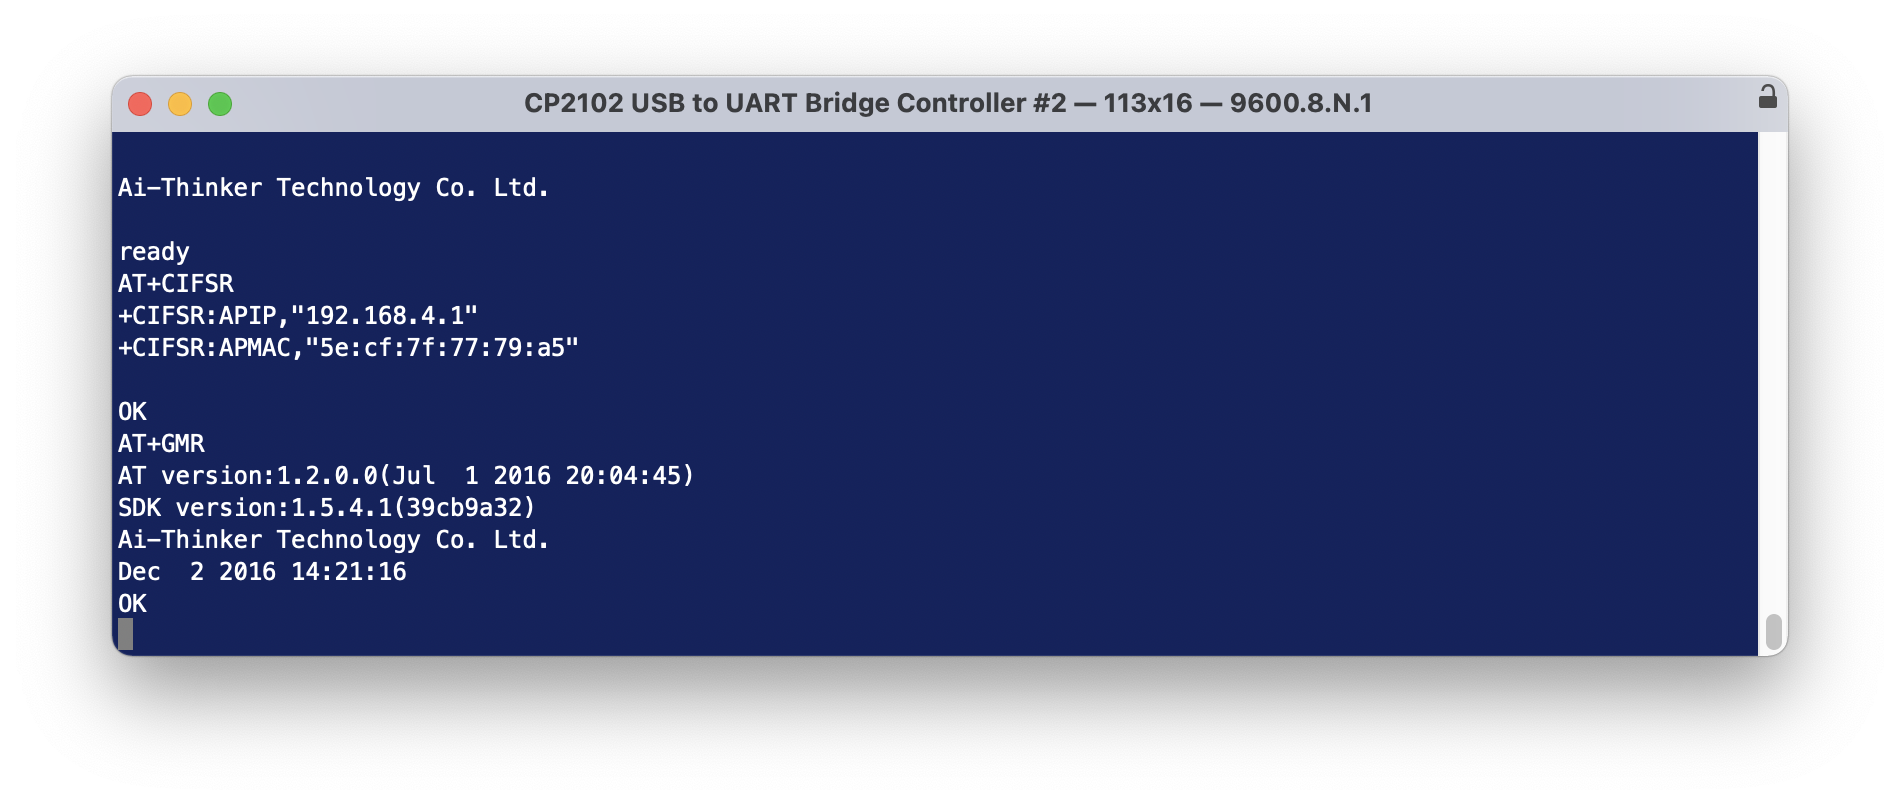
All going well when connected to the computer and you power it on a response will be emitted. And you can type in AT commands and get a response. On initial startup your baud rate will likely be 115200, 8, N, 1.
At this stage I should be able to send a hex string to the device over the terminal to get it to open/close a relay. But it doesn’t work.
Switching the Rx and Tx wires around (just at the board end), and changing the terminal settings to 115200 baud, and power cycling the device – I can send the hex control codes to open and close the relays. But the AT commands no longer work.
Now, lets do something interesting:
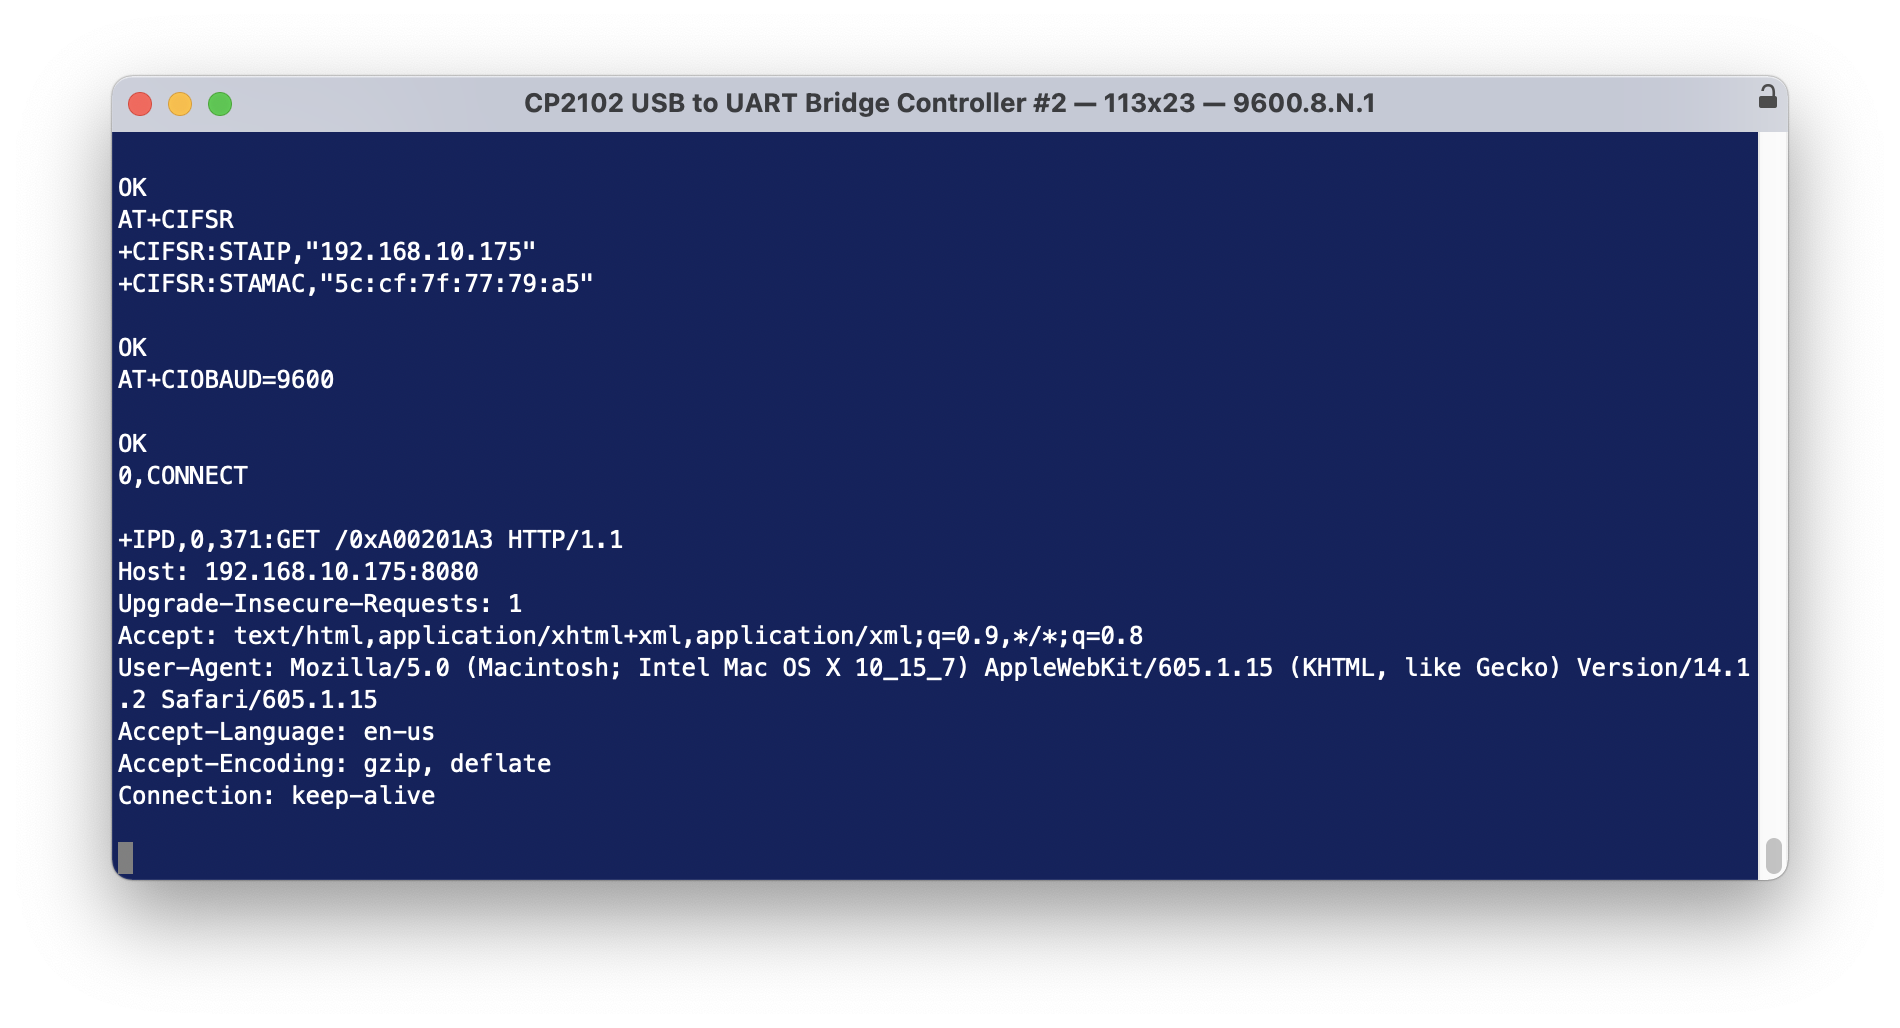
Send the following AT commands (line at a time). The CWJAP line should be altered to be your WiFI network name and password. The AT+CIFSR will emit a response telling your the connected IP addresses and device mac address.
AT+CWMODE=1
AT+RST
AT+CWJAP=“IOT WiFi”,”cryptic01″
AT+CIPMUX=1
AT+CIPSERVER=1,8080
AT+CIFSR
AT+CIOBAUD=9600
Next, from a web browser on the same network, try this…
http://192.168.10.175:8080/xA00201A3
it’s not going to actually do anything because it’s not valid, though we will see some action and it proves we can communicate with the ESP01 – when you sent the web request – you should see the blue light on the ESP01 flash for a moment.
So… simple. All we need to be able to do now is actually send the open/close sequence in some way such that it can be recognised by the ESP01 and passed through to the onboard chip.
Using a Mac App called Hex Fiend I created separate files that contains only the hex sequence for Open (relay 1) and Close (relay 1)
Then using terminal send those files to the device. There was activity by the device but it isn’t good enough to open or close the relay.
nc 192.168.10.175 8080 < relay1open.bin
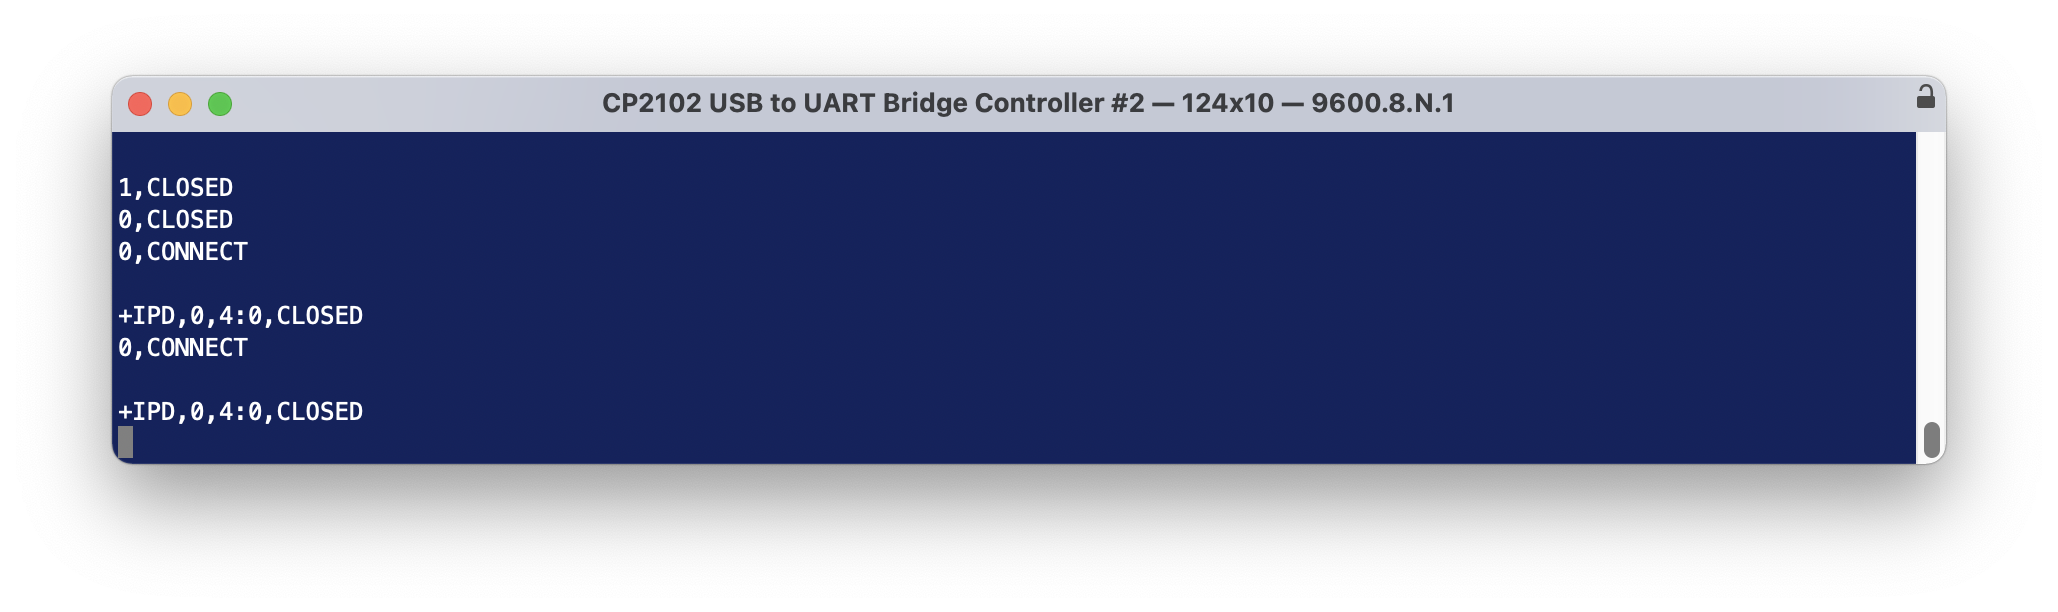
These work too.
echo -n -e “xA0x01x01xA2” | nc 192.168.10.175 8080
echo -n -e “xA0x01x00xA1” | nc 192.168.10.175 8080
echo -n -e “xA0x01x01xA2” | nc -v 192.168.10.175 8080
0,CONNECT
+IPD,0,4:0,CLOSED
If at this point the relays do not switch on/off when you are sending these commands, respecify the Baud rate … modern boards appear to operate quite happily on 115200, while perhaps the older boards had to be at 9600.
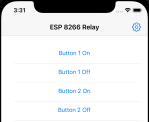
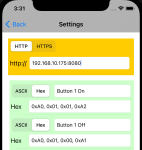
Time for some extra good news if you’re an iPhone user. I’ve written an iPhone application that allows you to send Hex commands to a specified IP address:port. Testing is going really well and I’ll see if I can get it released into the AppStore. I also hope to release the source on GitHub.
-
- pastedgraphic 16
-
- pastedgraphic 17
The other thing I found is if you power cycle the device, some configuration needs to be reset.
I need to find out how to make this permanent.
AT+CIOBAUD=115200
AT+CIPMUX=1
AT+CIPSERVER=1,8080
Home Assistant Integration
If you are running Home Assistant then you’ll want to edit your configuration.yaml file to include this
switch:
– platform: command_line
# scan_interval: 10
switches:
relay1:
command_on: echo -n -e “xA0x01x01xA2” | nc -v 192.168.10.175 8080
command_off: echo -n -e “xA0x01x00xA1” | nc -v 192.168.10.175 8080
friendly_name: Relay 1
relay2:
command_on: echo -n -e “xA0x02x01xA3” | nc -v 192.168.10.175 8080
command_off: echo -n -e “xA0x02x00xA2” | nc -v 192.168.10.175 8080
friendly_name: Relay 2
Update and restart Home Assistant.
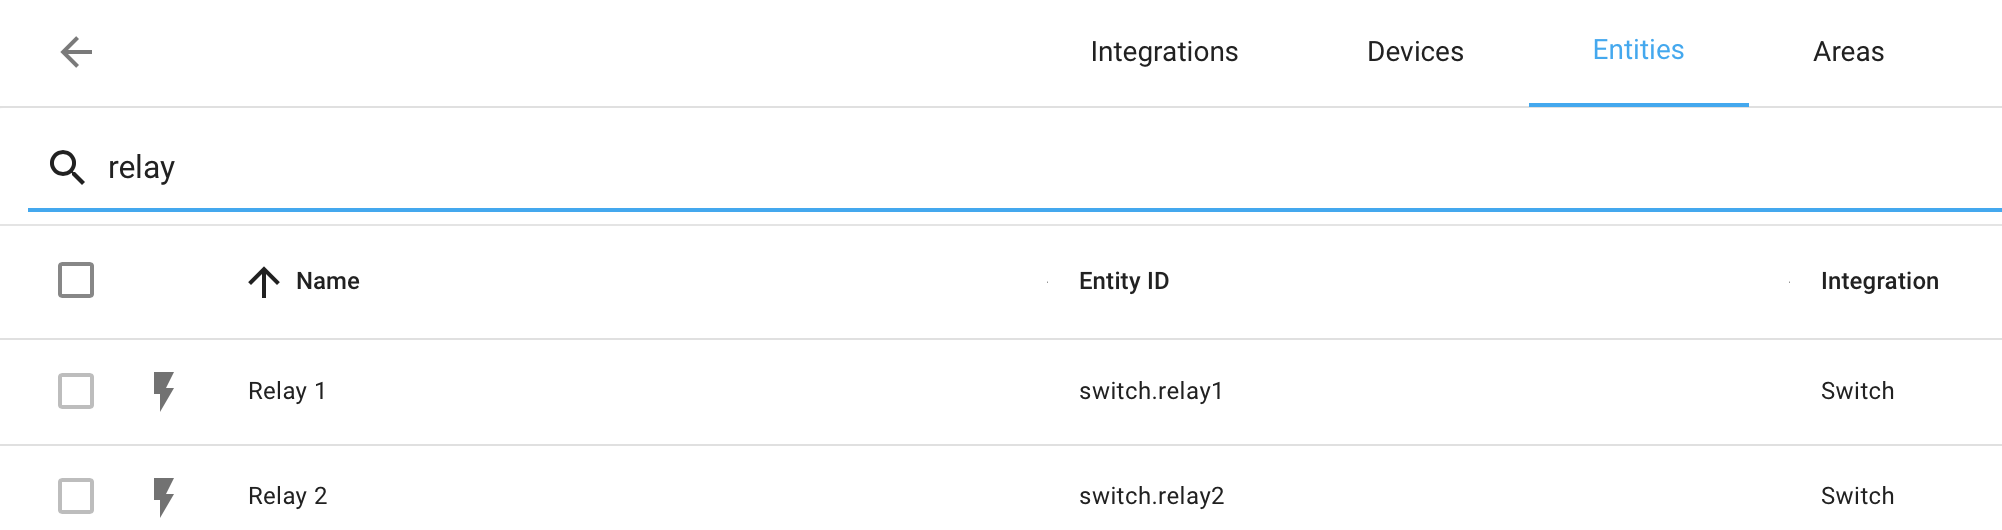
The relays turn up under Entities as shown below
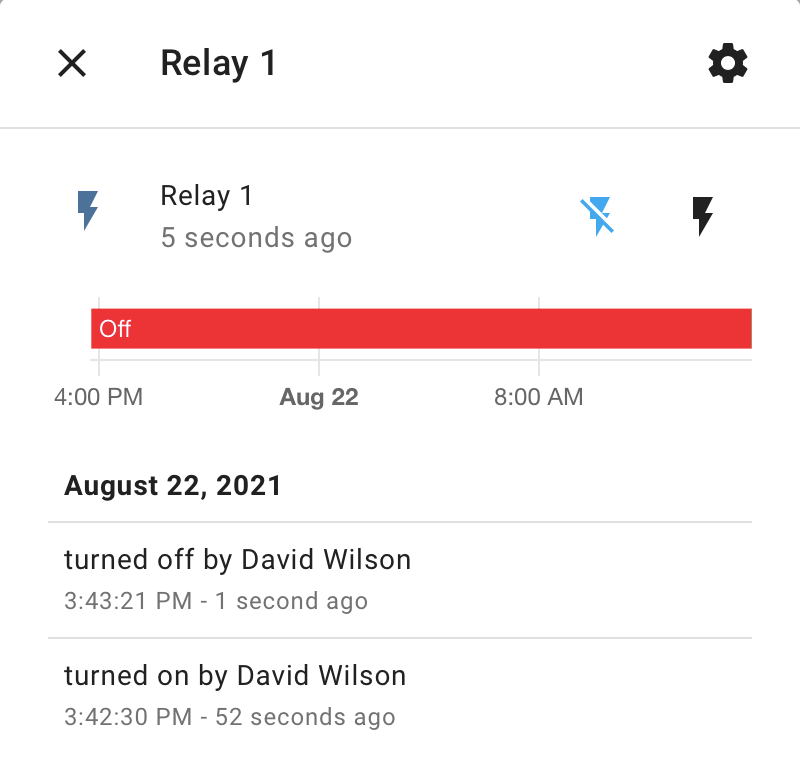
Selecting one brings up this screen where you can click the lightening bolts to send the on/off command sequences.
If you also have the HASS Bridge installed for HomeKit integration, you need to check that the configuration will send through details of switches. That way your switches will automatically turn up in HomeKit.
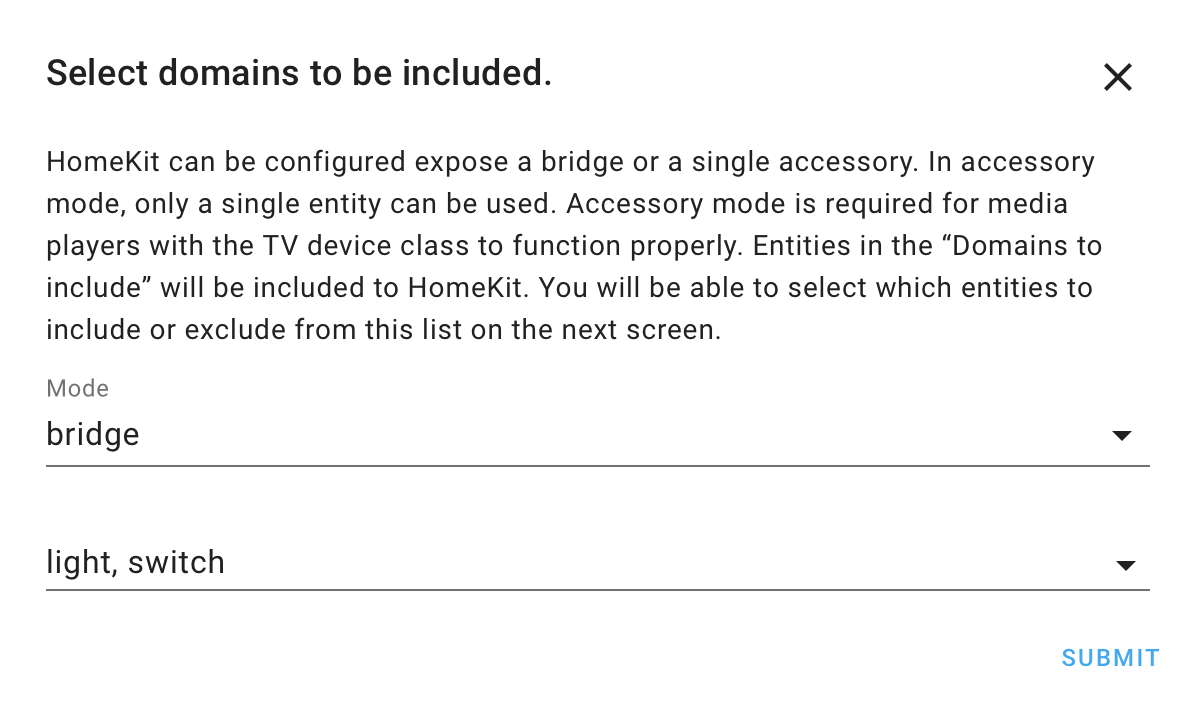
HomeKit integration!
See Home Assistant integration – that needs to work first.
Or buy a relay board that already has HomeKit integration and it will just work – out of the box.
https://www.aliexpress.com/item/1005002668732508.html?spm=a2g0s.9042311.0.0.27424c4d2qKTPZ
My homekit screen below will look a bit messy … letting the switches come through the HASS brough more than I wanted. I’ve highlighted below with a red rectangle the switches that came through that I wanted.

Finally… Here are details of another board that I found that uses the same Hex sequences for opening/closing the relays. It also says “Status inquiry: FF” – although with my boards I have not got this to work. http://www.chinalctech.com/cpzx/32.html
David Wilson
https://dgwilson.wordpress.com
https://nz.linkedin.com/in/dgwilson65
macOS running on VMWare ESXi 7 5 January 2021
Posted by David Wilson in General.add a comment
#macOS
#VirtualMachine
#ESXi
You can run macOS as a virtual machine on VMWare ESXi 7… along with other virtual machines.
Warning: macOS terms of service may permit you to run macOS as a virtual machine – proceed on your own choice, also refer license agreement below.
You will need a installation of VMWare into which you can create the macOS virtual machine. VMWare ESXi will need some dedicated hardware to run on. I have a Levovo Tiny PC, with 16GB of ram and a 240GB SSD. If you haven’t seen one – it’s physically of a similar size to a Mac Mini. When you perform the initial installation of VMWare ESXi you will need a monitor and keyboard attached – after that you won’t need them. I would recommend a large SSD – initially I had a 120GB SSD and have since changed it for another I happened to have – depending on what you want to do I would recommend a minimum of 512GB.

The installation sequence:
1. Setup the VMWare Host PC – ensure you have memory and SSD/Hard drive space
2. Download and create VMWare ESXi install media
3. Install VWare ESXi
4. Install VMWare Unlocker software (I’ll explain why later)
5. Create macOS install image (you don’t need to create a physical USB key for this)
6. Install VMWare Tools on the macOS image
7. change the macOS screen resolution – using the command line instruction
8. Find something to do with the new macOS installation! – While I’ve done this – I haven’t actually used it.
ESXi
https://my.vmware.com/en/web/vmware/evalcenter?p=free-esxi7
You need to create an account for your free download and license key.
You will want to download “VMware vSphere Hypervisor (ESXi ISO) image”.
Then setup a USB key with the .iso image to install on your server.
ESXi – Unlocker
This is a very small and quick installation. It is needed because any attempts to install macOS cannot be completed because there seems to be no keyboard or mouse support – this means you can’t select any of the required install options etc.
https://github.com/hugepants/esxi-unlocker
https://www.insanelymac.com/forum/topic/335756-macos-unlocker-v30-for-vmware-esxi/page/4/
macOS – install image
https://virtuallywired.io/2020/08/01/create-a-bootable-esxi-7-usb-installer-on-macos/
macOS – Install
https://www.techrepublic.com/article/how-to-virtualize-macos-on-vmware-esxi/
Be sure to install VMWare tools for macOS.
macOS Screen Resolution
https://www.virtuallyghetto.com/2015/10/heads-up-workaround-for-changing-mac-os-x-vm-display-resolution-in-vsphere-fusion.html
/Library/Application Support/VMware Tools
./vmware-resolutionSet 1920 1080
Apple Licence Agreement
https://www.apple.com/nz/legal/sla/
https://www.apple.com/legal/sla/docs/macOSCatalina.pdf
(iii) to install, use and run up to two (2) additional copies or instances of the Apple Software within virtual operating system environments on each Mac Computer you own or control that is already running the Apple Software, for purposes of: (a) software development; (b) testing during software development; (c) using macOS Server; or (d) personal, non-commercial use.
What Next
In theory with all this done you should be able to create snapshots and clones of the machine… I haven’t done this due to being “disk space challenged”.
You could install Xcode and use it as a server for automated testing.
You could install macOS Server and use the machine for server things…
You could use it to test OS releases before installing on your main desktop / laptop to increase your own level of confidence that these installs will be successful on your real machine. Maybe Snapshot first so you have something to go back to in case of issues.
You can export/import VMWare images – I did this when I changed the SSD. Use OVF Tool to export them as OVAs and then re-import them.
https://code.vmware.com/web/tool/4.4.0/ovf
Install this on your desktop computer… Then do something like:
ovftool vi://192.168.1.1/VM1 vm1.ova
then
ovftool –dm=thin vm1.ova vi://192.168.1.1/
… although I did the import from the VMWare GUI.
And done. Have Fun. Learn. Enjoy.
iOSUIActivityViewController and Objective-C 4 January 2021
Posted by David Wilson in General.2 comments
#iOS
#OBJC
#OBJECTIVE-C
I wanted to include the iOSUIActivityViewController (Share Sheet) into my application and all of the example code on the web pretty much is written in Swift. Additionally beyond the initial simple code I wanted a bit more control over how the share information is presented. Then share slightly different information for AirDrop vs Mail vs Twitter – this requires using the protocol UIActivityItemSource.
The images below show the results of this working solution where the share sheet has been presented giving the user control over where to share too. Additionally the mail message has a custom subject line. When you drag the sheet up, you get to see additional sharing options such as Save to Photos, Save to Files, Print, Copy and edit the actions.
I’ve built a demo application and have shared this in GitHub here: https://github.com/dgwilson/iOSShareActivity
It is a demo app that shows how to use UIActivityViewController with Objective-C. Includes use of procol UIActivityItemSource and LPLinkMetadata. This is a working demo, built successfully with Xcode 12.3 for iOS 13 deployment target to an iPhone 7 running iOS 14.4
I had a lot of difficulty getting the initial summary information to display how I wanted it to and thought that the LPLinkMetadata would give me total control. So improvement is likely possible.
I did have the Application icon displaying at one stage, for now I’ve landed on what works for me. There seems to be some AI control over what is displayed that took control away from the developer.

The core of the work is done in the code below – it will do the job without any more code. Though to share to AirDrop (Image only) a bit more code is required. See the demo application.
NSArray * theItems = @[self, favouriteImageItemView.itemImageView.image]; // SELF - big clue, because the protocol UIActivityItemSource is declared in the @interface this now means the protocol procedures are invoked, for example - activityViewController:itemForActivityType: - they are only invoked if SELF is passed into theItems Array.

UIActivityViewController *controller = [[UIActivityViewController alloc]
initWithActivityItems:theItems
applicationActivities:nil];
controller.excludedActivityTypes = @[UIActivityTypeAssignToContact,
UIActivityTypeOpenInIBooks, UIActivityTypeAddToReadingList];

controller.popoverPresentationController.barButtonItem = self.shareButton;
controller.popoverPresentationController.permittedArrowDirections = UIPopoverArrowDirectionUp;
[self presentViewController:controller animated:YES completion:^{}];
And here is my code for the LPLinkMetadata. In the demo App, uncomment the line meteData.originalURL and rerun the app to see what happens.
- (LPLinkMetadata *)activityViewControllerLinkMetadata:(UIActivityViewController *)activityViewController API_AVAILABLE(ios(13.0))
{
NSLog(@"%@ %@", NSStringFromClass([self class]), NSStringFromSelector(_cmd));

UIImage * justAnImage = [UIImage imageNamed:@"JustAnImage"];
UIImage * theImage = [UIImage imageNamed: @"AppIcon"];
NSItemProvider * iconProvider = [[NSItemProvider alloc] initWithObject:theImage];
// NSItemProvider * iconProvider = [[NSItemProvider alloc] initWithObject:justAnImage];
NSItemProvider * imageProvider = [[NSItemProvider alloc] initWithObject:justAnImage];
LPLinkMetadata * metaData = [[LPLinkMetadata alloc] init];
metaData.title = @"This title shows we care";
// metaData.originalURL = [NSURL URLWithString:@"https://www.apple.com"];
// metaData.URL = [NSURL URLWithString:@"https://www.apple.com"];
metaData.iconProvider = iconProvider;
metaData.imageProvider = imageProvider;

return metaData;
}
-

- screenshot 2021 01 03 at 9.23.00 pm
-
- screenshot 2021 01 03 at 9.23.51 pm
-
- screenshot 2021 01 03 at 9.24.43 pm
-

- screenshot 2021 01 04 at 11.10.37 am
Hoping someone finds this useful.
– David
David Wilson
https://dgwilson.wordpress.com
https://nz.linkedin.com/in/dgwilson65
Power BI – SharePoint List 2.0 Beta connector 9 November 2020
Posted by David Wilson in General.Tags: m, PowerBI, PowerQuery
add a comment
#PowerBI #PowerQuery #M
The October 2020 release of Power BI includes the new SharePoint List 2.0 Beta connector. Keen to try it out I had a go at upgrading my imports of existing lists to the new connector.
I was able to, in most cases, update the references to the SharePoint List by editing one line in the Power Query code.
From this:
Source = SharePoint.Tables(“https://xxxx.sharepoint.com/sites/MyList”, [ApiVersion = 15]),
To this:
Source = SharePoint.Tables(“https://xxxx.sharepoint.com/sites/MyList/”, [Implementation=”2.0″, ViewMode=”All”]),
That was the easy part. The good news is that the import/load is now much cleaner and it brings in renamed columns as their new names.
I struct a particular challenge with the “People” type column definition and with the field being partially populated – for example we have 50 customers in the list and only three of them have an assigned or populated “Service Manager”. So extracting those details, which are there, became particularly difficult.
The solution turned out to be a custom line of Power Query code. I used the community forums and twitter to get the answer… and it consumed a lot of time. Here’s the line of code:
= Table.TransformColumns(#"Added Custom1", {{"Custom", each if Value.Is(,type list) then {0} else [title = "not assigned"], type record}} )
Annoyingly the “secret sauce” is _{0}
More details can be found in the community post discussion on this: https://community.powerbi.com/t5/Power-Query/Extracting-Title-from-SharePoint-Online-list/td-p/1475340
On the journey I found some Power Query (M) blog posts – totally awesome…
https://ssbi-blog.de/blog/technical-topics-english/lists-in-power-query-how-when-and-why/
https://ssbi-blog.de/blog/technical-topics-english/records-in-power-query-how-when-and-why/
https://bengribaudo.com/blog/2018/09/13/4617/power-query-m-primer-part9-types-logical-null-binary
Enjoy.

