
A color palette tool for designers and developers. A great addition to any creative software toolbox for Windows.
Our free version is currently available for download!
- Windows Vista through the latest Windows 10 supported.
- No ads
- No nags
- Limited to 16 colors per palette
- Only 2 palettes open on screen at once.
 Click Here to download the ColorCoder FREE version.
The kind people of Softpedia reviewed ColorCoder and gave us a 100% Clean award!
PRO benefits:
- 32 Colors per palette
- Up to 10 palettes open on screen at once.
You can use this Handy palette tool to help organize or manage your palettes.
ColorCoder – Help
Welcome to ColorCoder! If you don’t find the answer to the question that lead you here, please shoot us an email and let us help you out.
ColorCoder was created to allow quick access to color hex codes for coding and/or design work. I assume you are here because you’re trying to get something done, so let’s get started. I will speak to everything here in its default state to begin with, before I get to how you can change the options.
If you haven’t already, run ColorCoder. If this is your first t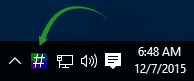 ime running it, you won’t see anything except the icon in your system tray. A default palette is loaded automatically. If you don’t see it there, click the little arrow and see if it’s tucked up with your extra System Tray icons.
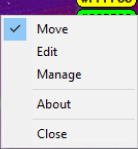
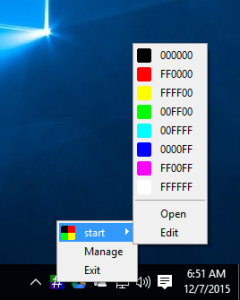 If you right click on this you’ll get the system tray menu for ColorCoder. This will show you a list of your current palettes, as well as the options for Manage and Exit. Predictably, Exit will close the program completely.
If you hover over your palette, it will pop up and allow you to choose a color to be inserted into your clipboard. Open will pop up the palette to stay on your screen, while Edit will open the edit screen for this palette.
Edit Window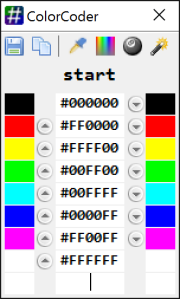
You can type into any of the fields with a color listed. You don’t need to type the #, as it will be inserted automatically. In this way you can change any color on the list, or you can add new colors at the bottom. You can use the arrow keys on your keyboard to navigate up and down the list. You can click the up and down arrow buttons to reorder the items in your palette.
From the left, we’ll go through the items in the tool bar:
 Save: This will save any changes you’ve made to the palette. Closing the Edit window will prompt to ask you if you want to save, if you haven’t.
 Copy: This will copy your current palette to the clipboard. This will allow you to paste this into a new palette file, email, or chat to share your palette.
 Grab: Click on this, then click anywhere on your screen(s) to grab the color for your palette.
 Color Picker: This will bring up the Windows Color picker. You can select from the colors in the list, or open the window for custom colors.
 Random Color: If you aren’t sure where to go with your palette, or just need to fill it with colors for some reason, this will add a random color to the bottom of your palette each time you click it.
 Magic Color Blender: This will give you a color that is the result of somewhat randomly blending the top two colors in your palette. Great for creating secondary brand colors.
To remove colors from your palette, select the text and hit Delete or Backspace on your keyboard. If you hold Backspace after deleting a color, it will jump up to the next color and begin deleting (best if you intend to clear a palette and start over).
Open Palette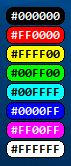
When you open a palette it will appear on your screen.
You can see the hex code for the colors in your palette, and you can see that the # is included. When you click on a color, that color, with the # will be copied to your clipboard to be pasted elsewhere. You can drag the palette to your desired location with the mouse. Right clicking on the palette will give you some further options for it.
 Move: This is selected by default so that you can move your palettes. If you uncheck this, your palette’s location will be locked so that you cannot move it by accident.
Edit: This will bring up the edit window that we talked about earlier.
Settings: This will bring up the Manage window, with the current palette selected so that you can edit the settings for this palette, as well as view your global settings.
Close: This will close this palette (ColorCoder will continue running).
Manage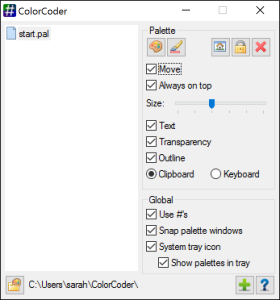
Clicking Manage from the System Tray menu, or Settings from the right click menu on a palette will bring up this window. If one is not selected, click on a palette in order to edit its settings. Edit the Global settings at the bottom at any time.
If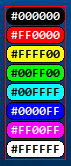 your palette is open when you select it in the list, it will get a bright border so that you know which palette you are affecting.
Let’s go through the contents of this window:
Palette List: This is your list of palettes. These palettes are stored as .pal files in your Users folder by default. Below the Palette List you will see a folder icon. You can change your palette folder here.
Toolbar:
 Open the selected palette.
Edit: Open the Edit window for the selected palette.
 Reset Palette Location: If your palette gets lost off your screen due to changing resolutions, use this button to reset its location to the default, so that you can move it back to your desired location.
 Lock Palette: This will lock all of the options for this palette so that you can’t change it. Good for that moment when you decide everything is exactly the way you want it. Click the button again to unlock the palette and change the options again.
 Delete: This will delete the selected palette. This cannot be undone.
Move: Locks and unlocks the ability to drag the palette around. This and the option from the right click menu on the palette are the same.
Always on top: You can keep your palettes on top of all of your other programs. Find the place it lives on your screen and never be without your palette.
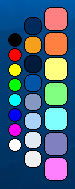 Size: This slider will let you choose how big your palette swatches are. This image shows a few of the available options.
Text: Whether or not to show text in the palette. This controls the width of the palette.
Transparency: Choose whether the spaces between the swatches is transparent.
 Outline: Whether the swatches have a black outline on them.
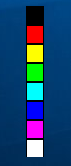
Clipboard: Having this option chosen has the hex code copied into your clipboard when you click on a color swatch. This is the default option.
Keyboard: Having this option chosen will put the hex code into your keyboard buffer to be type into a field. To use this, make sure your cursor is in the location you want the hex to appear, and then click on your color swatch.
Global Options:
- Use #’s: Will turn on and off # being sent to your clipboard or keyboard buffer. #000000 vs 000000.
- Snap palette windows: When moving palette windows, they will snap to each other by default. Turn this option off to be able to have palettes stacked on each other, if you want that sort of thing.
- System tray icon: If you don’t find yourself using the system tray icon for ColorCoder, you can turn it off. If this is turned off, closing the Manage window will close all of your palettes as well (it will warn you).
- Show Palettes in tray: If you keep the system tray option on, but don’t use the palettes from there, you can turn them off so that you won’t see them flyout when you have the mouse button over them. In this case, clicking on the palette name in the system tray menu will simply open your palette.
New Palette: The + icon will allow you to create a new palette. When you click on it you will be prompted for a new palette name. Type in the name and hit OK to be brought to your new blank palette.
If you came to the help looking for a feature and you didn’t find it, let us know. We want this to be a useful tool that you love!
Credit to: FamFam Silk, Mark James http://www.famfamfam.com/

