14 DAY TRIAL //
 Digital photos get the best of anything placed in front of the camera lens, but at the cost of a few megabytes for each picture. While that is a small price to pay for a life memory, large size pictures don’t really work out in every situation. For when that happens to you, Shrink O’Matic can help you dial down their impact on your storage space and get them "fit" enough for emailing or online sharing.
Digital photography is pretty much what makes our lives recordable and ready for processing (editing, cropping, resizing, etc). If there was ever a downside to it, it’s related to the huge amount of space it requires, due to the great level of detail it stores in every picture. It’s not a feature that email services and online social networks handle very well at this point in time, but there is a workaround this thing, provided by specialized software that can shrink your pictures in size, so they can fit any requirement.
Shrink O’Matic was built for this purpose only and is the simplest and most straight forward resizing solution I came across until now. It’s free of cost and aside from shrinking your pics, it also allows you to convert them to three of the most popular formats out there, namely: JPG, GIF and PNG.
Since it’s an Adobe Air based application, you will need this installed on your system and that’s about the only requirement you’ll have to fulfill in order to run it. Much like its name, the application is pretty cool and fun and you’ll begin to experience that from the first contact with its interface.
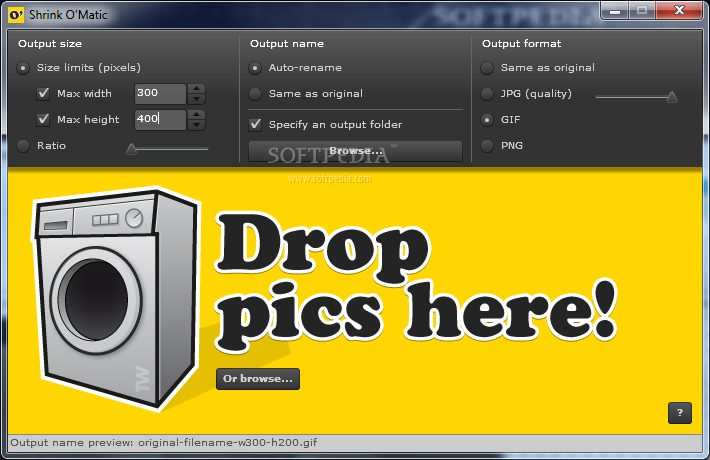
The main and only window of the program is appealing to any crowd, due to the wise choice of graphic elements that also attracts through the idea it depicts. The whole concept is built around an automatic washing machine that shrinks everything you feed it. Unfortunately, the elements are not animated, but it would have been really nice if you could see the machine actually washing your photos, with maybe some foam or detergent lying around.
However, it’s pleasant to the eyes as it is and it’s extremely easy to use, due to the fact that all the options are gathered in the main window, in plain sight. It’s advisable that you configure them prior to adding the pictures, because once you feed it the images (by drag & drop or by browsing to their folder), the application is going to start processing them without notifying you. There is no ‘Start’ or ‘Go’ button, so the resizing process starts as soon as you've finished placing the photos in the washing machine.
The first of the three option sections allows you to set the output size (in pixels), which by default is 200 x 200, but you can change it by manually entering the maximum width and height. Also, if you prefer, you can modify only one of these two, by un-checking the other one. Another option is to resize the pics by ratio (values from 1 to 100), by using your mouse to move the little slider which also indicates the value you are currently at. The output results will keep the aspect ratio of the original photos, which means that their sizes may not correspond with the exact values you entered.
For the output name, you should look at the next section, which provides only two patterns for the processed files. One is ‘Auto-rename’, which uses the original file name, followed by width and height, or ratio, whichever method you have chosen in the previous section. The other one will hold on the exact original file name, and if you check it, the application will display a ‘Warning!’ sign saying that files may be overwritten in case the output folder is the same as the original. Still, if you want to keep the name and the original files too, the software has an option to select a different folder for the resized images.
The last of the three fields sections you to select the output format, which can be the same as the original or one of the JPG, GIF or PNG formats. If you opt for JPG, you get to select the image quality, with the aid of a bar, similar to the one for modifying the ratio.
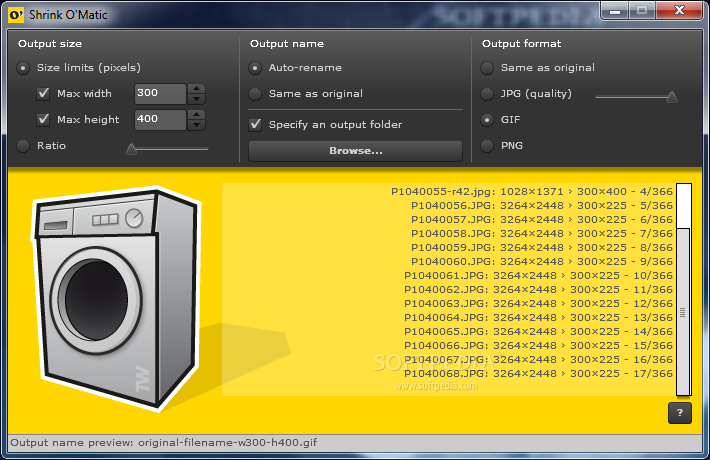
The best thing about Shrink O’Matic is that it works with batches of images and resizes them at a decent speed. We tested it with 370 pictures and it took approximately 5 minutes, which is pretty great but at the cost of a high stress on the memory usage. When at work, it can eat up to 35% of the CPU and about 100 MB of the system RAM (tested on Intel Dual CPU T2410 with 2 GB of RAM).
The Bad While we haven’t experienced bugs or crashes during its testing, the application could be improved feature wise. It could definitely become a refined product if it came with a few additional functions, such as a more wide range of renaming options and a few filters that could make the output images less deficient in matters of quality. Here are some snapshots of the application in action:
The Good
The Truth