14 DAY TRIAL //
 TrueCrypt was discontinued a while back, and it was considered one of the most effective tools to help protect files by creating virtual, password-protected drives that you can use just like any other local or removable partitions.
It's still possible to download and use TrueCrypt, but you may be interested in alternative disk encryption software. In this guide, we're exploring three such tools that are free to use: VeraCrypt, Cryptainer LE, and LibreCrypt. But since it's easy to feel overwhelmed by the advanced settings available, we're showing you the quickest route if you want to create virtual drives, as well as mount and unmount them.
VeraCrypt
After launching VeraCrypt, click Create Volume. Once the VeraCrypt Volume Creation Wizard is brought up to the screen, check the Create an encrypted file container box and click Next to proceed, check the Standard VeraCrypt volume box and click Next to continue.
In Volume Location, click Select File and use the integrated file browser to indicate where you want to save the encrypted container and what you want to call it (destination and filename). This container is just like any another file (doesn't have an extension to make it difficult to figure out) as well as the one you have to mount in order to copy sensitive files to and from (more on this later). It can be stored on the hard disk or a removable storage device, for example, as long as you can find and launch it. Make sure you don't enter the same name as an existing file because it will be deleted and replaced with the container file. Also, the drive where you're creating the container should have enough free storage for housing the sensitive files. Click Next to proceed.
The following wizard stage allows you to customize Encryption Options. You can leave these settings as they are (Encryption Algorithm to AES and Hash Algorithm to SHA-512) and click Next to continue.
Next, you can define the Volume Size by clicking the empty box, entering a number and picking the measurement unit between kilobytes (KB), megabytes (MB), gigabytes (GB) and terabytes (TB). This represents the maximum storage capacity allocated to the container file and should be large enough for moving your private files. At the same time, you have to be careful not to borrow too much storage from the partition that hosts the container file, depending on its total capacity. The application shows the Free space on drive, so you can use it as reference. Click Next to go on.
In the Volume Password wizard step, click the empty boxes to set the Password necessary for accessing the encrypted drive and Confirm it. It's generally recommended to create a complex password, made from many characters with lower and upper case letters, numbers and even symbols (such as ! or ?) as well as to avoid dictionary words to make it tricky to guess by other people. Make sure to remember it, though. Click Next to continue.
The Volume Format area is responsible for the formatting settings of the new virtual drive. In Options, set Filesystem to NTFS (for virtual drives larger than 2GB) or FAT32 (for virtual drives smaller than 2GB) and Cluster to Default, then move your mouse pointer over the wizard window for as long as you can, preferably until the red bar under Randomness Collected From Mouse Movements turns green and fills up.
Click Format to finish the wizard and create the virtual volume. The task shouldn't take long, and VeraCrypt shows a message at the end to let you know it's over. Click Ok for confirmation and Exit in the wizard.
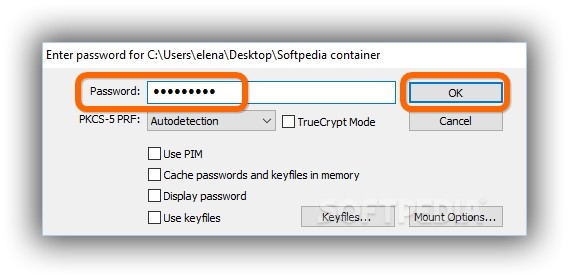
To mount the container file and use it just like any other partition to perform file operations within, click Select File in the main app window, use the file browser to go to the container file and Open it, select a drive letter (one that's not currently used by another partition), click Mount, enter the Password you specified when creating the virtual drive, and click Ok.
Once the virtual drive is mounted, you can view the assigned Drive letter in the drive list, along with the container's full path (Volume column), Size, Encryption Algorithm used, and Type.
Open Windows Explorer or another file manager and locate the new partition. Now you can copy files to this drive, knowing they will be safely stored inside the container file once you Dismount the virtual partition from the main window of VeraCrypt.
Cryptainer LE
When firing up Cryptainer LE, you're welcomed by a Create Volume wizard. Click Next to proceed.
In the Volume Size and Label area, click the Cryptainer and 25 boxes to Enter desired Volume Label (as you want to view the encrypted drive in Windows Explorer) as well as to Enter designed Volume Size. The LE edition allows volume sizes only up to 100MB. Click Next to continue.
The following wizard stage handles the Volume File Name & Location. Click Browse and use the built-in file navigator to tell the program where you want to save the container file, as well as the filename. Click Next to go on.
Next comes the Volume Password & Encryption Algorithm panel, where you can enter the password that will be required for accessing the encrypted partition, Verify Password by retyping it (without pasting) and set Encryption Algorithm to AES256. Click Next to proceed to the following step.
In Volume Format, check the Format the new volume to use the FAT file system box and click Next to go on. In the last wizard stage, you can review settings and click Start to build the encrypted volume. Unlike VeraCrypt, Cryptainer LE doesn't give you the possibility of picking a preferred drive letter as it automatically assigns one and mentions it in a popup message after creating the virtual partition. It's auto-mounted afterward, so you can open Windows Explorer to access it.
To unmount the virtual drive, open the File menu and select Unload Cryptainer Volume or press Ctrl+U. To mount it again, select the Primary Volume pane from the main window, open the File menu and pick Load Cryptainer Volume or press Ctrl+L.
LibreCrypt
After launching LibreCrypt, click the New button in the main window to trigger a wizard. Check the Container file box in the New Container Wizard and click Next to continue.
In the following panel, click Browse and use the integrated file navigator to specify the name of the container file and where you want to save it. Click Next to proceed.
Afterward, set the Size of new container by clicking inside the 25 box to replace it with a new number or click on the two arrow buttons to increase or decrease it. Also, click the empty menu next to it to set the measurement unit to bytes, kilobytes (KB), megabytes (MB), gigabytes (GB) or terabytes (TB).
Next, you can set the password that will be requested by LibreCrypt to open the encrypted container (Keyphrase) and verify the password by retyping it (Confirm Keyphrase). Don't click Finish yet. Instead, click Next to be able to choose your preferred drive letter for the mounted virtual volume, provided that it's not already taken (Requested drive letter).
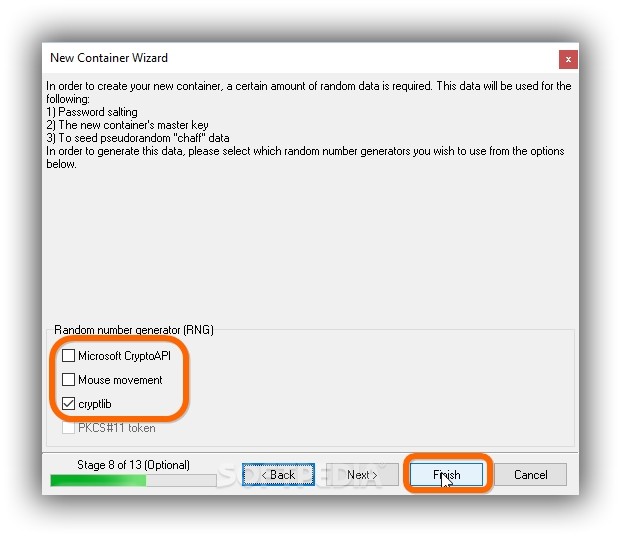
Click Next again and skip the following two panels by clicking Next (leave Select hash, Select cypher and Type of overwrite data settings as they are). In the panel with Random number generator (RNG), clear the Microsoft CryptoAPI box, leave the Mouse movement box cleared, and keep the cryptlib box ticked.
Now you can click Finish to complete the wizard. You will be prompted by a Format Removal Disk window to configure settings. Enter the preferred Volume label, click Start to format and create the virtual drive and Yes for confirmation. It will be automatically mounted by LibreCrypt, so you can open Windows Explorer to find it and perform file operations within.
To unmount the drive, select it from the main app window (in the list with Drive and Container columns) and right-click to Dismount or click the Dismount button or press Ctrl+D. To mount the drive again, click Open file in the main window or press Ctrl+M, locate and select the container using the file browser, enter the password in the Keyphrase box, and click Ok.
Play our video guide below to find out what you have to do to create a virtual drive, as well as to mount and unmount it using these three disk encryption tools. You can also download VeraCrypt, Cryptainer LE and LibreCrypt.
Create Encrypted Disks to Keep Photos, Documents & Others Truly Private
Learn how to use three advanced tools for creating virtual disks (the easy way) to protect your personal images, documents and any other types of files. Check out our video and guide: http://www.softpedia.com/blog/create-encrypted-disks-to-keep-photos-documents-and-other-files-truly-private-504247.shtml