14 DAY TRIAL //
 If you have multiple operating systems installed on your PC, check out our following guide to learn how to easily change the boot loading menu, preferred (default) OS to load, delay time before auto-loading the current selection, or display name of each OS.
We're breaking down two free-to-use applications, Visual BCD Editor and EasyBCD, in addition to a commercial product with richer features, Boot-US. Scroll down this article to play our video guide.
Visual BCD Editor
Visual BCD Editor represents a graphical interface for bcdedit.exe (bootcfg.exe on older Windows), the command-line tool for creating and editing BCD stores (Boot Configuration Data profiles), adding boot menu options, as well as repairing BCD stores and boot records, among other features.
To change the startup order of your operating systems, click Edit Boot Menu in the lower-right corner of the main window, select an OS entry from the list, and click the Up and Down buttons on the right to move them up and down in the sequence. To remove an OS from the Windows loading screen, select it and click Delete. When you're ready, click Ok for confirmation.
EasyBCD
In addition to editing the boot menu, EasyBCD has features for adding new entries with Windows, Linux/BSD, Mac or NeoGrub (boot into Linux and Windows legacy or hide drives), backing up and repairing BCD stores, as well as creating bootable media.
To modify the OS display order at computer boot, click Edit Boot Menu from the left, select OS entries from the list, and click the Up and Down buttons on top to move them up and down in the lineup. If you want to change the default operating system, tick the box of the new OS in the Default column (make it say Yes, the remaining ones will be set to No).
In the Edit Boot Menu area, you can also modify the display name of the operating systems (select an entry, click Rename and modify the text), remove an OS entry from the loading menu at PC boot (select an entry and click Delete) or switch from the classical black-and-white bootloader to the blue-and-white Windows 8 bootloader (tick the Use Metro Bootloader box). Moreover, you can set the delay before booting the selected OS (set the number of seconds next to Count down from) or Skip the boot menu or ask the computer to Wait for user selection (tick the desired option).
Once you're ready, click the Save Settings button in the Edit Boot Menu area to commit modifications.
Boot-US
Boot-US replaces the Windows boot loader with its own one. To install the new boot loader after launching the application, open the Boot manager menu and click Install to deploy a wizard. In the first wizard panel, you can view a list of all operating systems detected by the program. Tick the boxes of the ones you want to include in the new boot loader menu while keeping in mind that the deselected ones will not be shown.
To change their startup order, select the entries and click the up and down arrow buttons in the right until you get the right sequence. You can also modify their display name by double-clicking an entry or selecting it and pressing the Space bar or F2, then entering the new text. Click Next when you're done.
In the following wizard step, you can enter distinct passwords for each operating system that will have to be correctly entered by the person turning on the computer to gain access. An Administrator password for boot manager can be set too, so you can rest assured that someone else will not be able to access Boot-US and make modifications to the boot menu. If you're not interested in applying passwords, just leave the fields empty and click Next.
In the next wizard steps, you can configure Startup options: Startup delay (in seconds), Available time for user choice until the currently selected OS is autoloaded (enter the number of seconds or tick the Unlimited box to disable the timer), Output start signal (if you want the PC to produce an audio alert on startup, otherwise leave this box cleared), and Select last booted partition (if you want the PC to start the previously loaded operating system instead of the first one in the lineup). Click Next to continue.
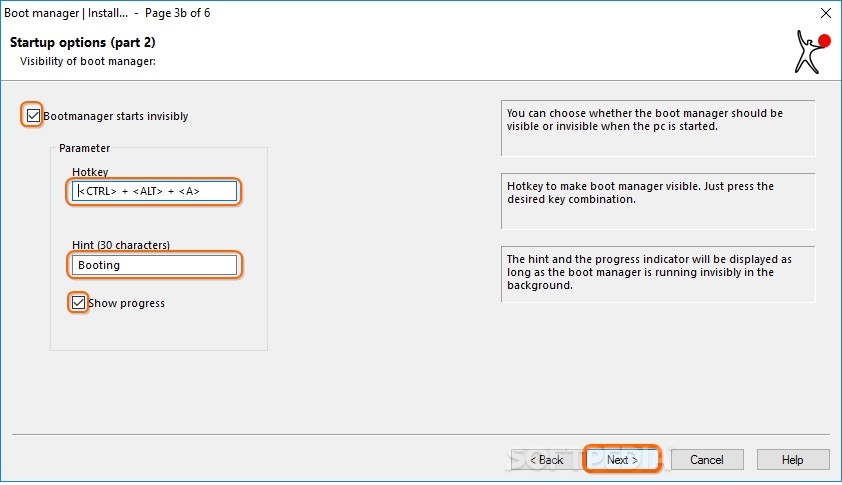
In the second part of Startup options, you can tick the Bootmanager starts invisibly box if you don't want it displayed at startup. If so, you can enter a Hotkey that can be triggered to make the boot loader visible, along with a Hint and progress indicator (Show progress). Click Next to continue.
In the following part, you can pick a Method for hiding partitions on boot, such as Hide primary partitions automatically, Hide primary and logical partitions automatically or Hide partitions individually (check the boxes of the partitions yourself). Otherwise, leave the Method for hiding set to Do not change partition IDs and click Next to proceed.
In the last part of the wizard, you can Select the install target, such as MBR on boot disk or Create image file for CD installation (ISO format). Click Next to review all properties, then Click Install and Ok in the confirmation message after the new boot loader is properly installed.
Play our video guide to see how these tools work. You can also download Visual BCD Editor, EasyBCD and Boot-US.
Customize Your Computer's Startup Options with These Boot Managers
If you have multiple operating systems installed on your computer, use these tools to control their startup order. Check out our article for more details: http://www.softpedia.com/blog/customize-your-computer-s-startup-options-with-these-boot-managers-505539.shtml