14 DAY TRIAL //
 If you want to take snapshots of your desktop or an application and draw on them to point out important parts to share with someone else, for example, to show a friend which buttons to click in a program to make it perform a specific task, you shold have the right tools at hand.
There are a lot of snapshot utilities out there. In this guide, we're looking into three apps to show you how to grab the screen and annotate the snapshots: Snipping Tool, Greenshot and WinSnap. They all have different capture modes, such as full screen, custom region or selected window, as well as various drawing tools and exporting options.
Snipping Tool
In Windows 10, press the Win key to search and launch Snipping Tool. It's built into the operating system, so you don't have to download and install it. Click the arrow button near New to choose the preferred screenshot grabbing mode between Free-form Snip (draw a line around the area you want to capture), Window Snip (capture an active window) or Full-screen Snip (grab all visible elements on the screen).
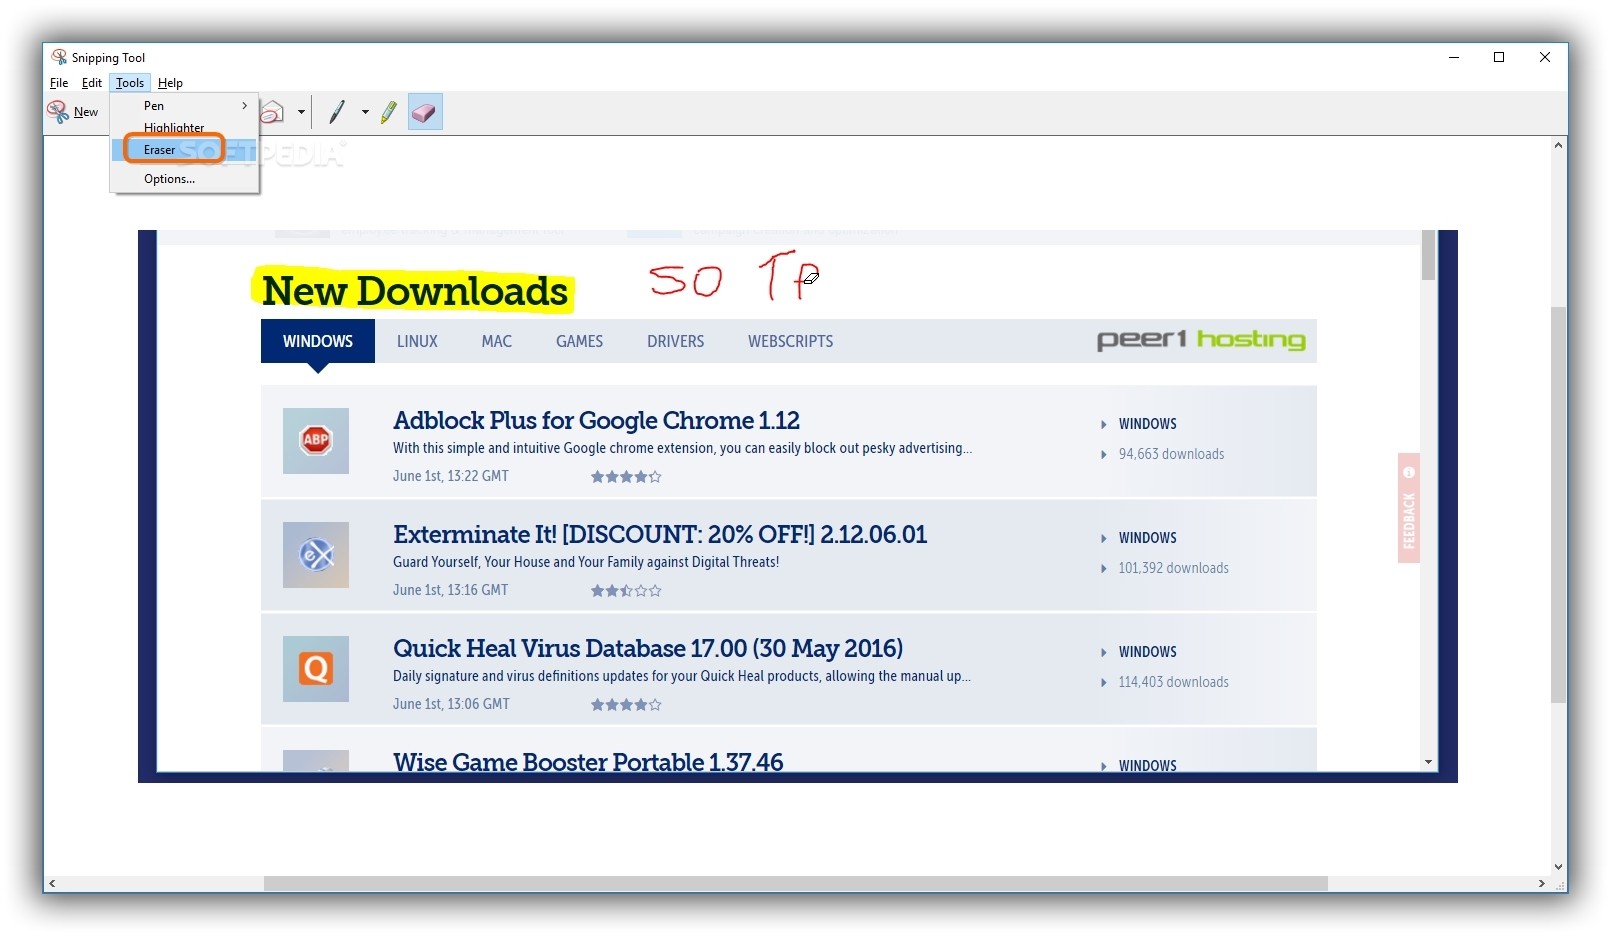
After capturing an image, the application opens an editor. Click the icon on the toolbar or open the Tools menu and select Pen. Open Tools -> Pen -> Customize to set the pen Color, Thickness and Tip by clicking the drop-down menus to pick options. Click Ok to apply changes.
Click the highlighter button on the toolbar or open the Tools menu to pick Highlighter andhighlight in yellow those parts of the image that you want to attract attention to. Click the eraser button on the toolbar or open the Tools menu to choose Eraser and fix drawing mistakes,
Greenshot
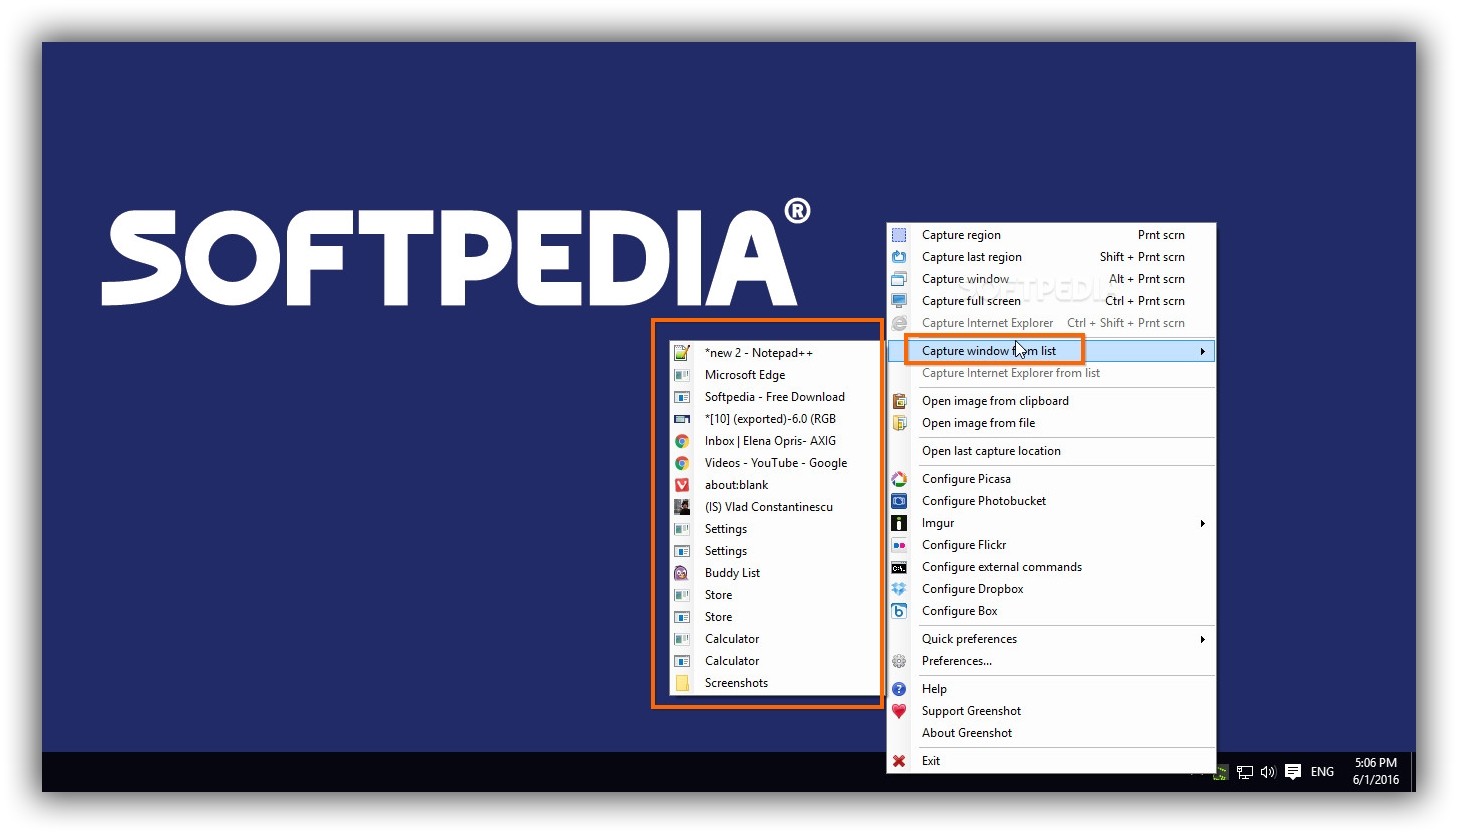
Once launched, Greenshot creates an icon in the systray. Right-click it to Capture region (or press PrintScreen) to draw a rectangular region while keeping an eye on the image size (width and height) and while viewing the cursor's position enhanced via a magnifier.
You can also Capture last region (or press Shift + PrintScreen), Capture window or object (or press Alt + PrintScreen), Capture full screen (or press Ctrl + PrintScreen), Capture Internet Explorer window (or press Ctrl + Shift + PrintScreen), Capture Windows from list (open a submenu with all active window and select one to grab its contents) or Capture Internet Explorer from list (similar, only for IE windows).
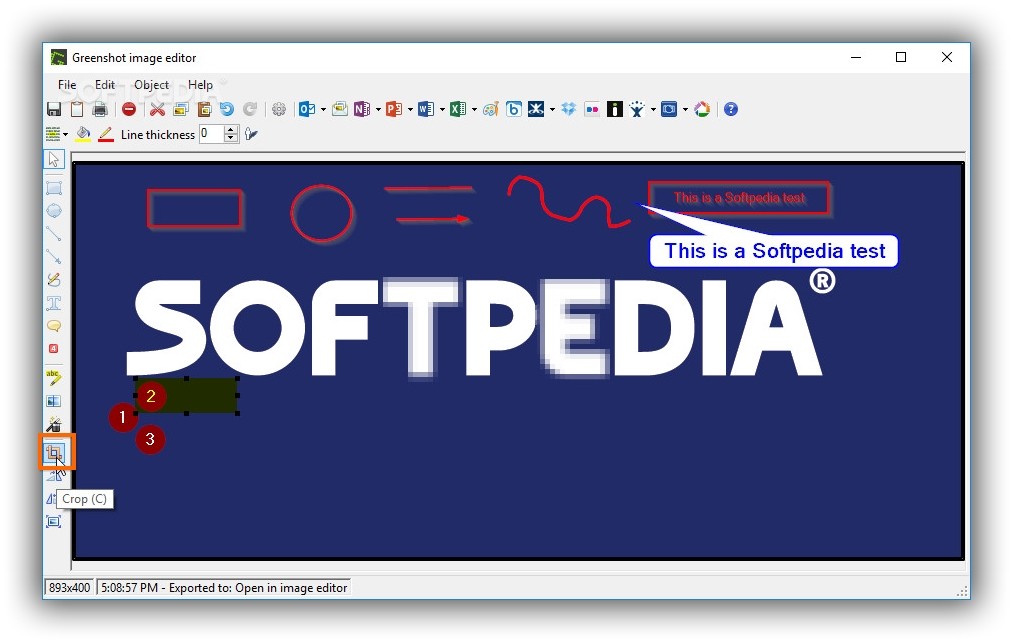
Once an image is captured, Greenshot opens a new menu with various exporting options. Click Open in image editor and use the drawing tools on the left horizontal bar to add annotations. Each has some customization options. For example, you can Draw rectangle (or press R, set the Line color and Line thickness, show or hide shadow), Draw ellipse (or press E), Draw line (or press L), Draw Arrow (or press A, same options as well as Arrow heads) and Draw Freehand (or press F).
Moreover, you can Add textbox (or press T, same options as well as font type, size, emphasis and alignment), Add speechbubble (or press S), Add counter (or press I, auto-incrementation), Highlight important parts of the image (or press H), apply Obsfucate effect (or press O) to blur unwanted parts of the picture, apply other Effects (Border, Drop shadow, Torn edge, Grayscale, Invert colors), Crop (or press C), Rotate clockwise (or press Ctrl + .), Rotate counter clockwise (or press Ctrl + ,) as well as Resize the photo.
To change the Capture Hotkeys, right-click the tray icon and go to Preferences -> General tab -> Hotkeys. To exclude the mouse pointer from the pictures, go to the Capture tab and clear the Capture mousepointer box.
WinSnap
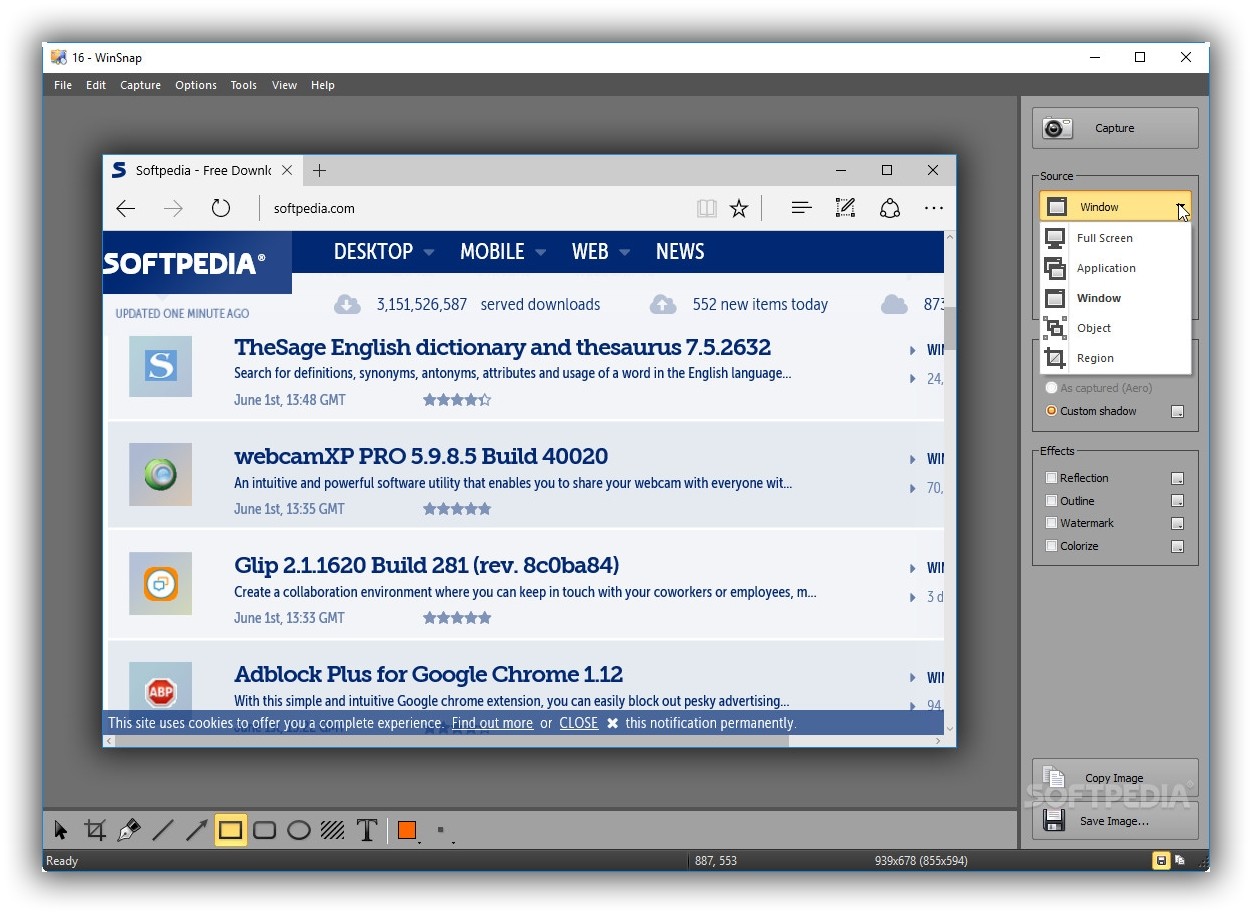
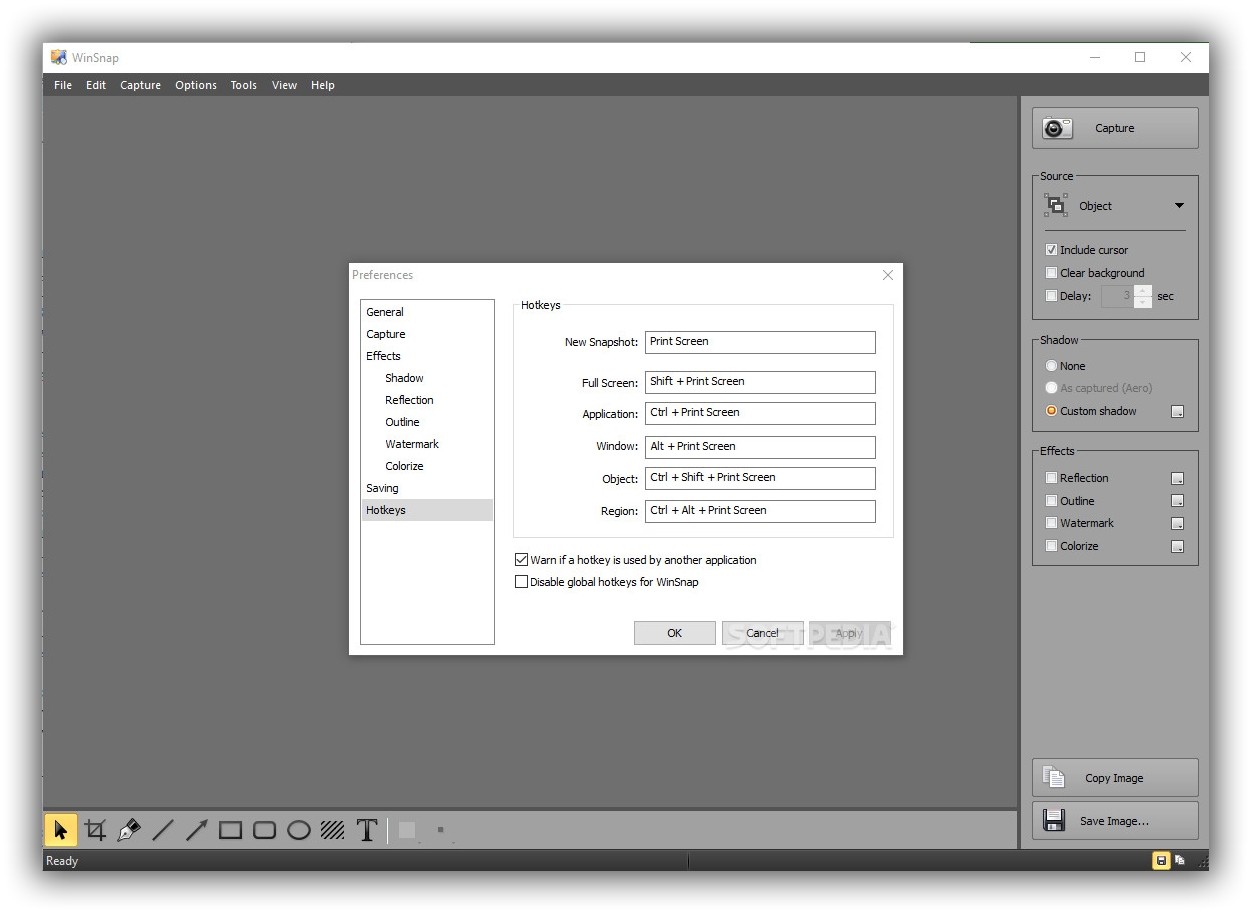
In the main window of WinSnap, click the menu below Source on the right to pick the capture mode between Full Screen (or press Shift + PrintScreen), Application (or press Ctrl + PrintScreen, last active application), Window (or press Alt + PrintScreen, last active window), Object (or press Ctrl + Shift + PrintScreen, any selected window or other object, hold down Ctrl to select multiple objects) or Region (or press Ctrl + Alt + PrintScreen, draw a rectangular region). Press the PrintScreen key to take a snapshot in the specified mode.
Once an image is grabbed, it's auto-opened in the WinSnap editor, where the drawing toolbar is shown on the bottom. Select the Crop Tool to cut out a specific part of the image and eliminate the rest, the Pen Tool to draw freely by clicking and dragging the mouse, the Line Tool to draw simple lines, or the Arrow Tool to point at something important in the picture. Additional tools can be used to Draw Rectangles, Rounded Rectangles or Ellipses, as well as to Highlight important bits and Add text.
Use the Select Tool to move and resize drawn elements, get rid of them if you change your mind (press Delete button), as well as to edit properties by double-clicking an item.
More options are available on the right side of the window. You can Include cursor in the captured images (even move or delete it with the Select Tool), Clear Background, apply Custom Shadow to the whole image, as well as apply Reflection, Outline and Colorize effects, in addition to a Watermark (text or image).
Open the Options menu -> Preferences (or press F2) and go to Hotkeys to set different key combinations for the capture modes.
Check out our video guide below to get a visual rundown of the three apps. You can also download Greenshot and WinSnap.
How to Take and Annotate Screenshots Like a Pro
Learn how to quickly grab images from your screen and show a demonstration to a friend by adding annotations. Check out our article for more info: http://www.softpedia.com/blog/how-to-take-and-annotate-screenshots-like-a-pro-504748.shtml