14 DAY TRIAL //
 Revo Uninstaller Pro is an advanced application designed to fully remove programs from the computer by finding and eliminating any leftover files, folders, and registry items.
It features many practical tools dedicated to secure file removal and disk space cleaning. We're breaking down Revo Uninstaller Pro in the following guide to show you how it works.
Getting started
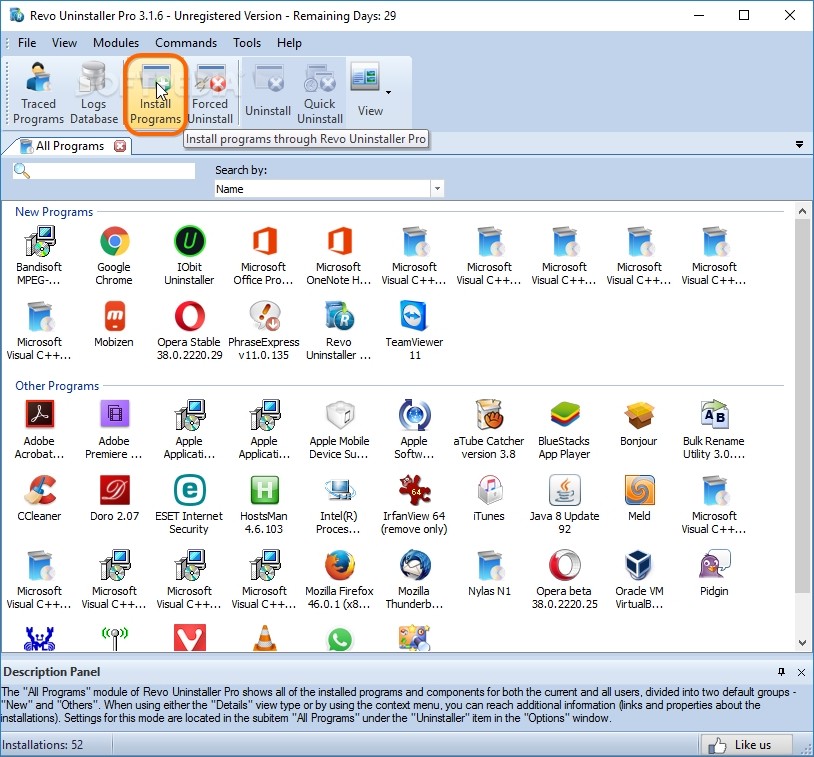
All installed programs are auto-detected by the app and shown at startup. The most recently installed ones are grouped in New Programs, and the remaining in Other Programs. By default, New Programs are considered to be those installed in the last week.
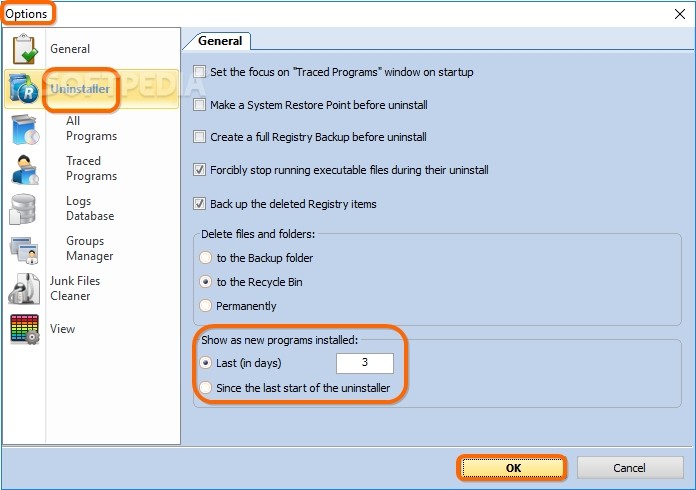
To customize this, open the Tools menu to click Options (or press Alt+O), go to Uninstaller, find the Show as new programs installed: area, set the number of days to take into account for recent apps, or select the Since the last start of the uninstaller checkbox instead of Last (in days). Click Ok to apply changes.
To change the viewing mode, click the View button on the toolbar and select List or Details instead of Icons. In Details mode, you can find out the Size, Version, Type (32- or 64-bit), Install Date, Company, Website, Comment, Uninstall String, and Registry Key for each app.
Uninstall
To remove a program, click it and then the Uninstall button from the toolbar, Commands menu or right-click menu (or press Alt+U).
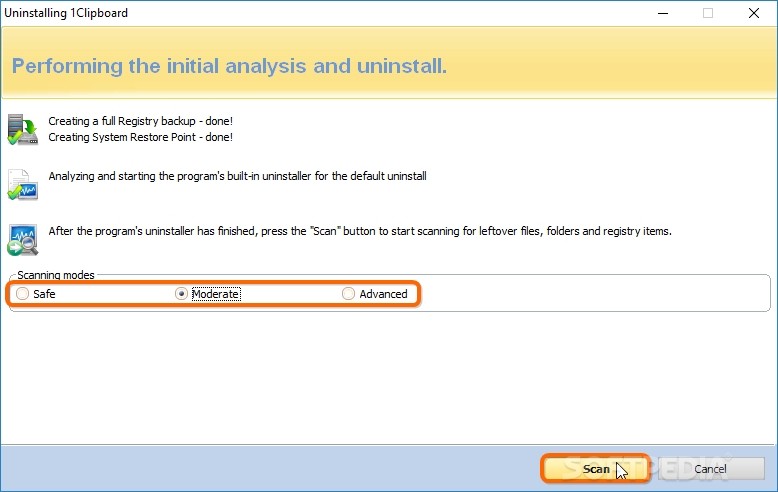
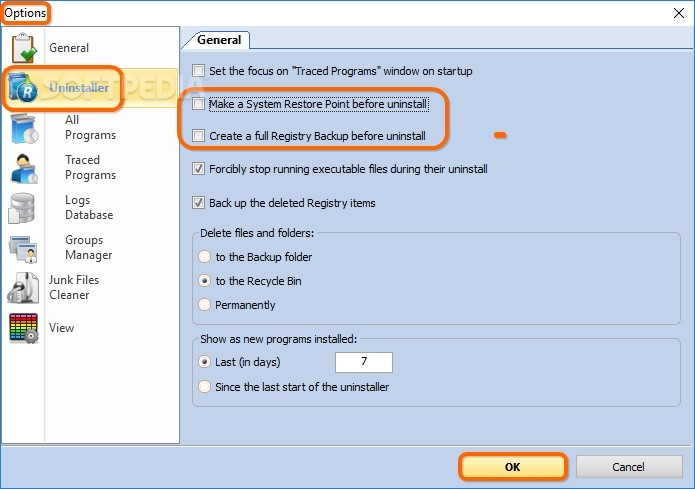
Revo Uninstaller Pro brings up a new window to the screen and starts by Creating a full registry backup and System Restore Point. If you want to skip these two steps for all apps to speed up the removal, open the Tools menu to pick Options (or press Alt+O), go to Uninstaller, clear the boxes of Make a System Restore Point before uninstall and Create a full Registry Backup before uninstall, and click Ok.
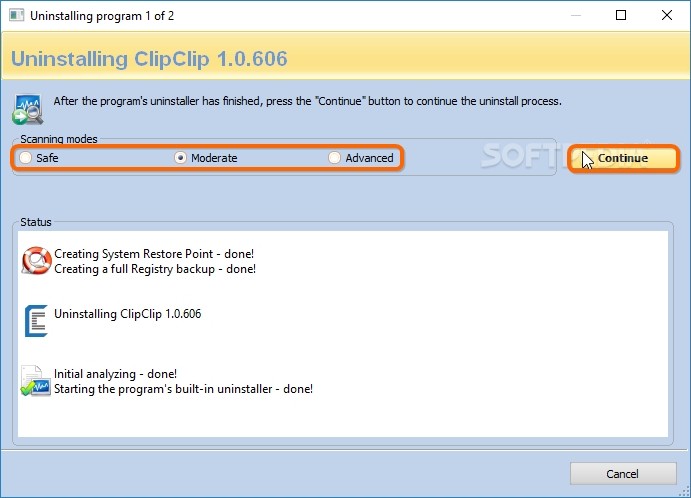
In the next step, it runs the program's default uninstall file from its directory, then it offers to scan for leftover files, folders and registry entries in three modes: Safe, Moderate or Advanced. Tick the preferred option and click Scan; if you're unsure, pick Safe.
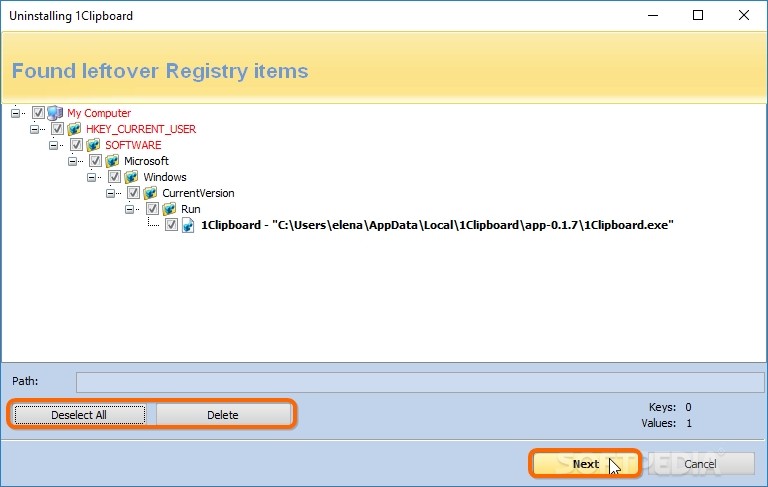
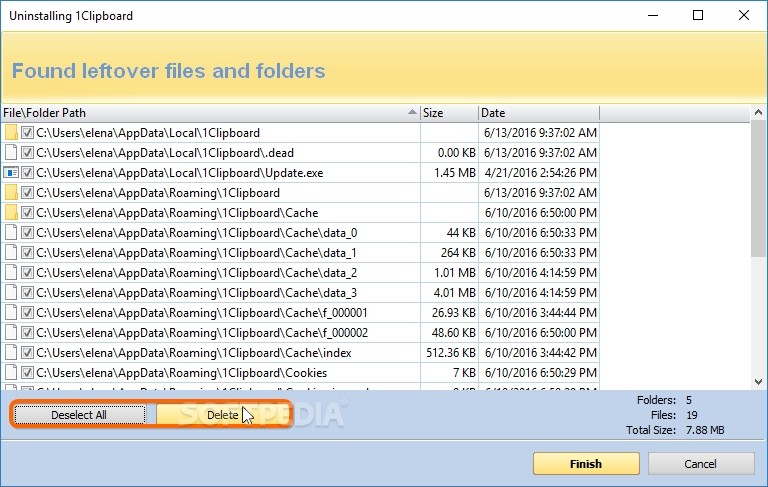
If any leftovers are found, the registry entries are displayed first, in a tree view. Click Select All then Delete, Next when you're done, and Yes in the popup window for confirmation. Leftover files and folders are displayed next, so you can click Select All, then Delete and Yes for confirmation.
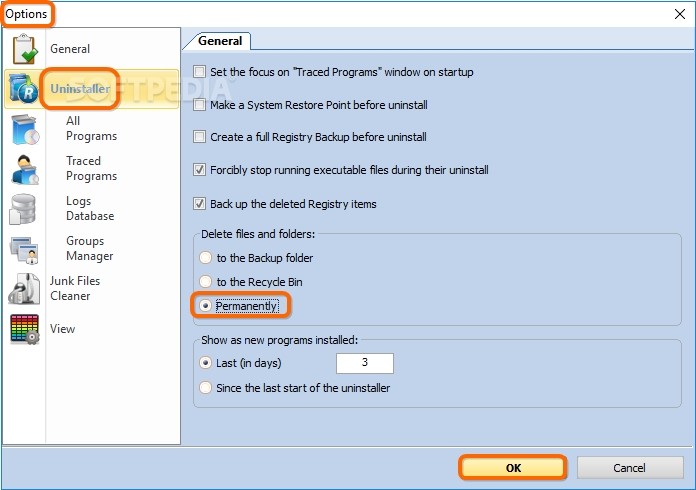
By default, all deleted files and folders are sent to the Recycle Bin. This way, you can revisit and restore the items if you change your mind. However, if you're sure you want to get rid of them, open the Tools menu to choose Options (or press Alt+O), go to Uninstaller, find the Delete files and folders area, and check the Permanently box instead of to the Recycle Bin.
Quick Uninstall
The only difference between Uninstall and Quick Uninstall is that the quick mode automatically deletes all leftovers while the regular mode gives you the possibility of analyzing and excluding items you'd like to keep on the hard drive.
Hold down Ctrl or Shift while clicking to make a multiple selection, then Quick Uninstall from the toolbar, Commands menu or right-click menu (or press Ctrl+Q). However, you still have to select the leftover scan mode from Safe, Moderate, and Advanced.
Forced Uninstall
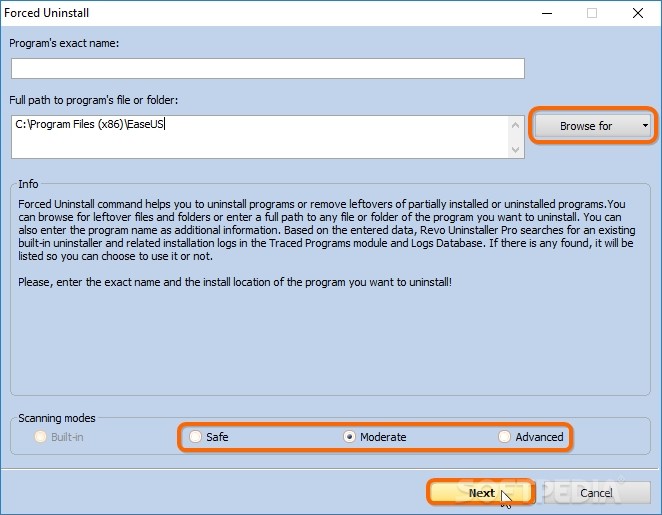
This mode detects any files, folders or registry entries left behind after uninstalling a program the traditional way (only by running the built-in uninstaller). Click the Forced Uninstall button from the toolbar or Commands menu (or press Ctrl+F). Next to the Full path to program's file or folder box, click Browse for and select File to locate a remaining file of the uninstalled program, or Folder to find a remaining folder. Otherwise, you can type the Program's exact name if you know it.
Choose the scan mode from Safe, Moderate, and Advanced, click Next, then Select All and Delete to get rid of leftover registry items, files, and folders.
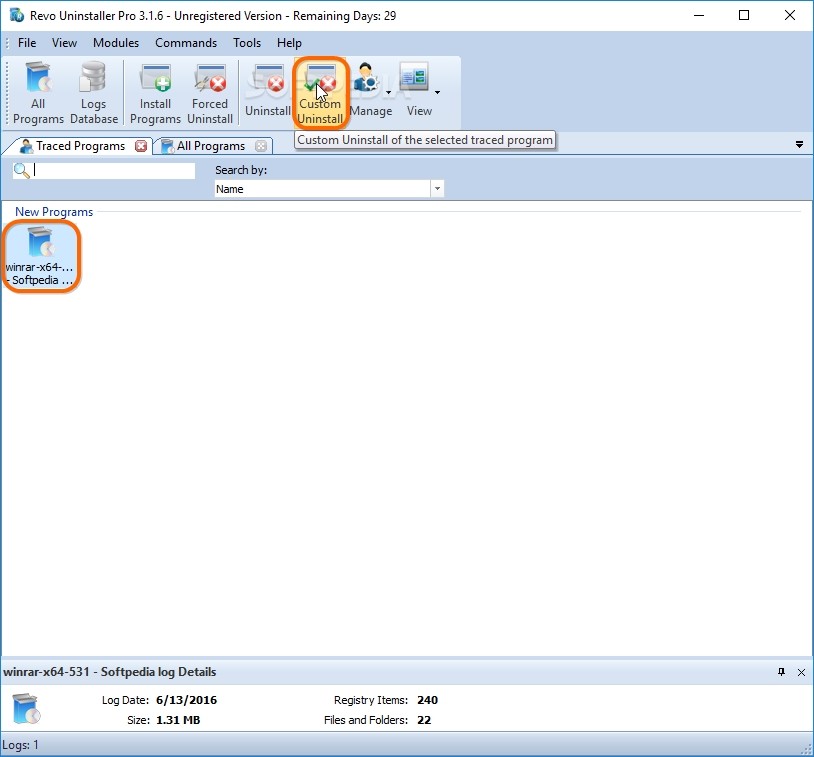
Install Programs and Traced Programs
If you install an application with the help of Revo Uninstaller Pro, it will be monitored. Revo will create logs to keep track of all files, folders and registry objects copied to the computer, thus maximizing efficiency when you want to thoroughly remove a program.
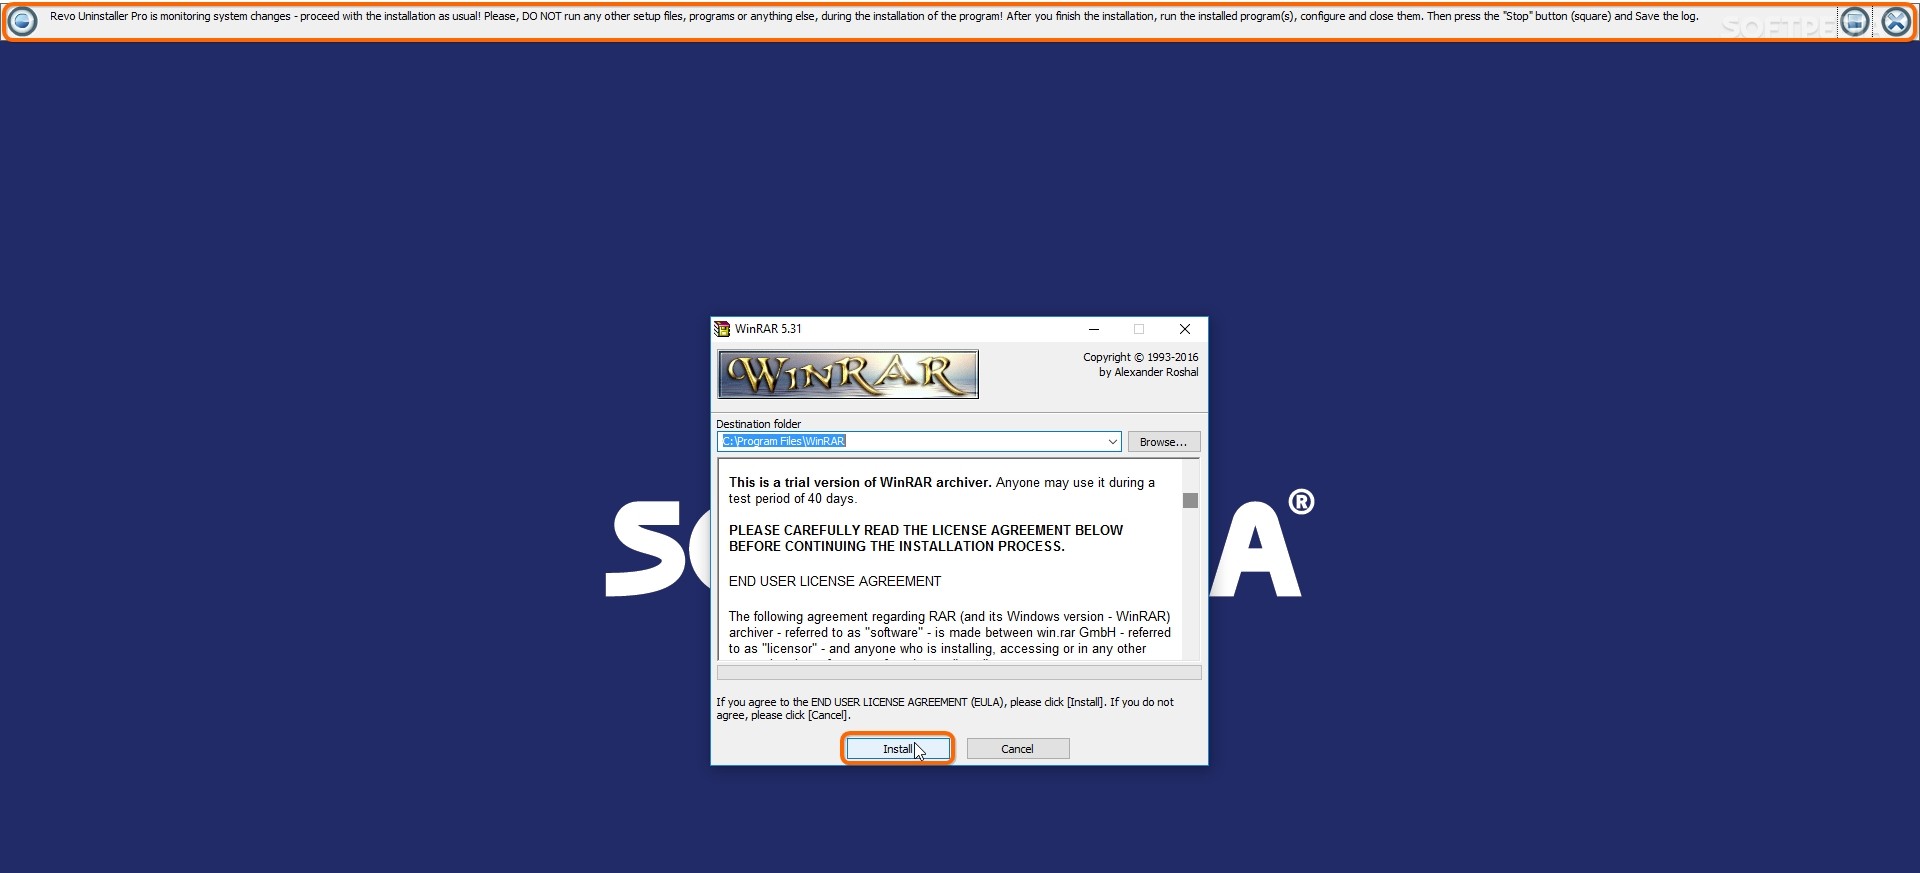
To do this, click Install Programs from the toolbar to locate and Open the setup file, or right-click an installer in Windows Explorer and pick Install with Revo Uninstaller Pro.
The setup file will be opened, so you can proceed with the typical installation. The difference is that it's being monitored by Revo, as you can see from the horizontal bar placed on the upper part of the screen. It's advisable not to run other setup files or launch other programs during this time, in order to avoid conflicts. Once the installation and configuration are done, click the Stop button (square icon) on the upper bar, Enter a name for the log to save, and click the Save button.
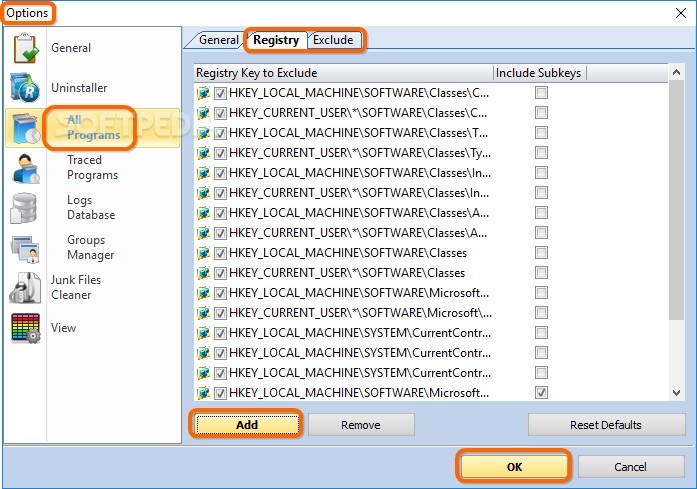
To protect certain registry areas or folders from Revo's scanner and make sure you won't accidentally delete them, open the Tools menu to choose Options (or press Alt+O), go to All Programs, then Registry and Exclude tabs to Add New Registry Key paths and Add New Folders. Afterward, visit the Traced Programs section to do the same thing for the Registry and Processes.
Custom Uninstall
Click Traced Programs from the toolbar or select it from the Modules menu (or press Ctrl+Alt+T). You can run Custom Uninstall to choose the exact system modifications you want to revert to the previous state.
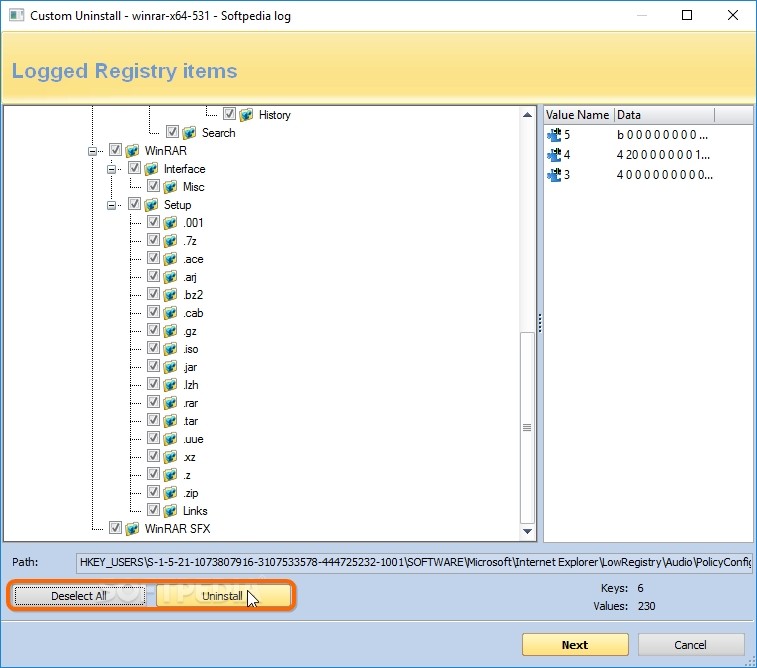
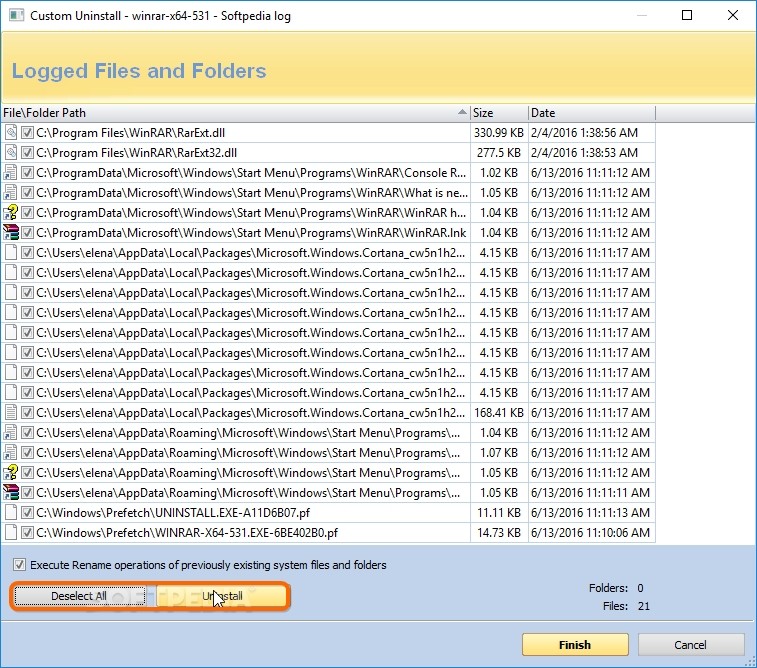
To do this, click Custom Uninstall from the toolbar or Commands menu of Traced Programs (or press Ctrl+C), analyze Logged Registry items in the popup window, click Select All, then Uninstall and Yes for confirmation. Next, you can view Logged Files and Folders, including their paths, sizes and dates, as well as click Select All, then Uninstall and Yes for confirmation. It's possible to keep any items by clearing their boxes or to skip the entire step.
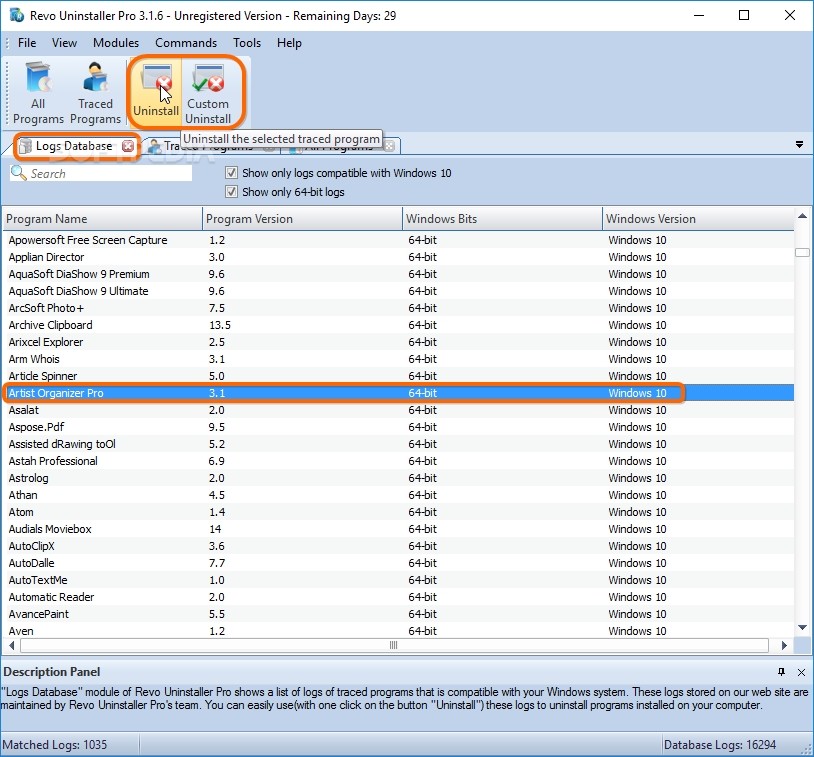
Logs Database
Revo Uninstaller Pro has a built-in Logs Database for many known programs, so you can explore this list and locate the apps you're interested in fully removing if you haven't installed them using Revo's monitor. To do this, click the Logs Database button from the toolbar or the Modules menu (or press Alt+L).
You can scroll the list of applications until you reach the one that interests you (or use the Search function), select it, and click Uninstall or Custom Uninstall from the toolbar. By default, only logs compatible with your Windows version and architecture type are displayed.
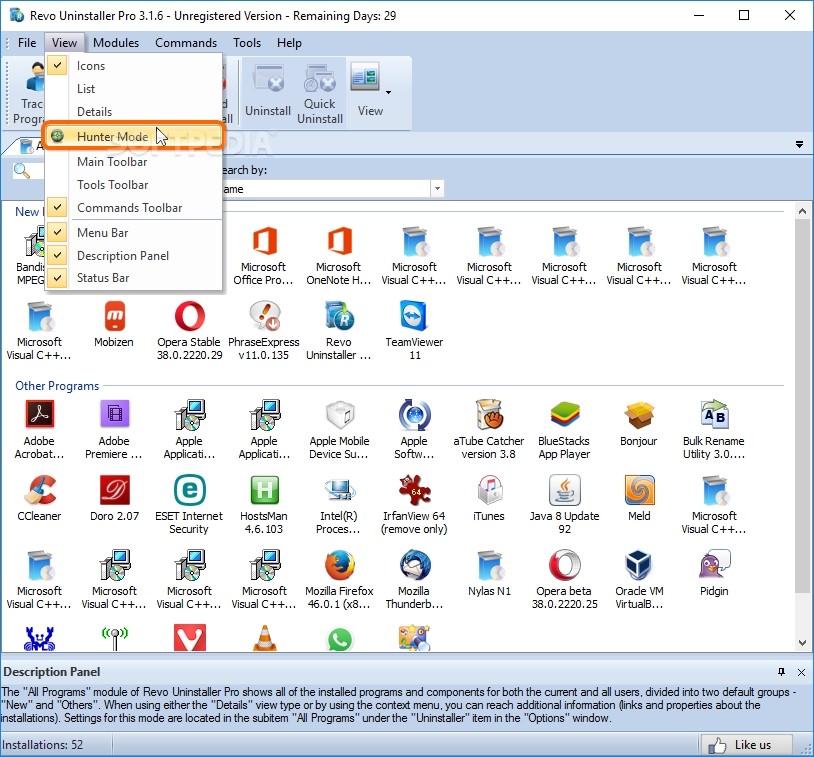
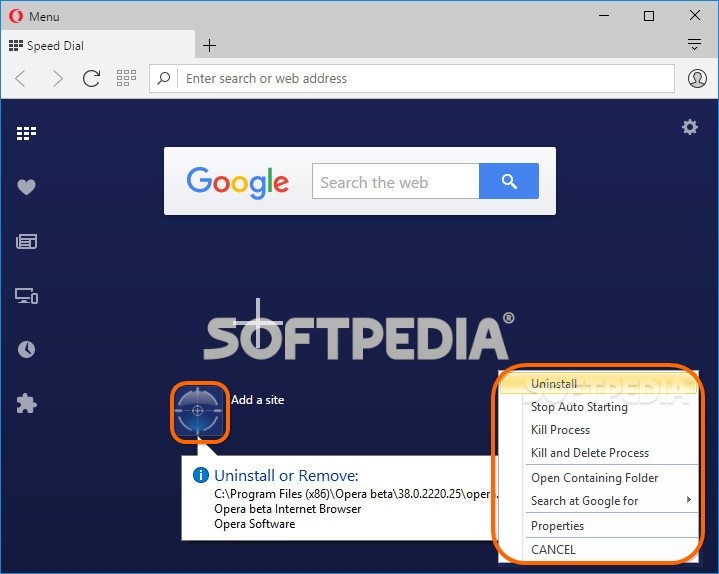
Hunter Mode
Open the View menu to select Hunter Mode. The main app window will be minimized to the systray, and a small, semi-transparent button with a crosshair will take its place. Click and drag it to a file, open window or taskbar object to auto-identify the corresponding application and open a context menu where you can perform the following actions:
Uninstall the tool (runs Forced Uninstall mode), Stop Auto Starting (prevent the tool from automatically running every time you turn on your computer), Kill Process (block the tool from currently running), Kill and Delete process (stop the tool's runtime and remove it), Open Containing Folder (in Windows Explorer), Search Google for (look up more information on the tool's name, file name or company name), view file Properties, or Cancel the task.
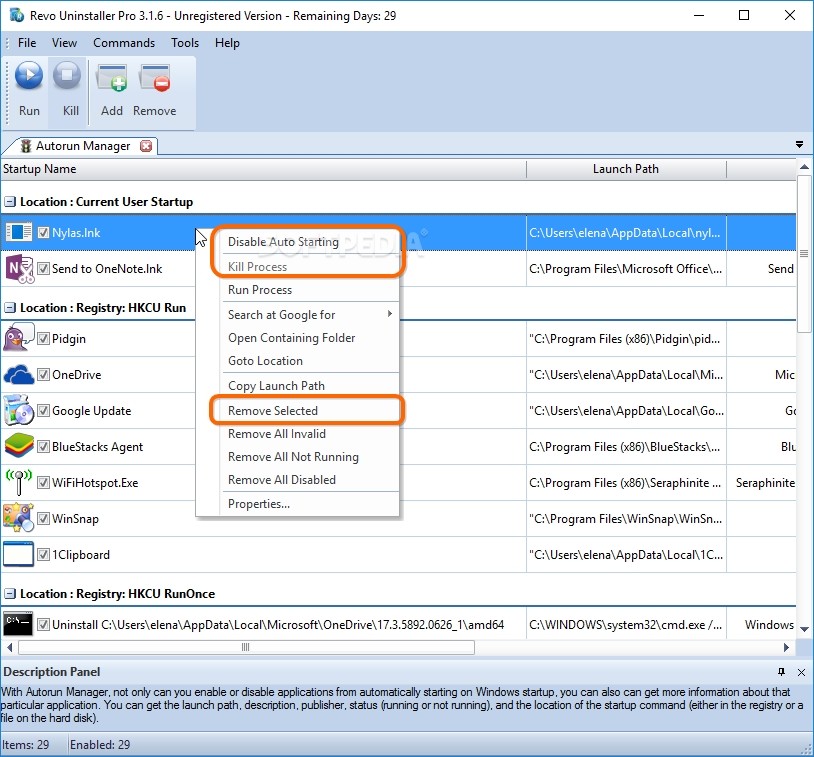
Tools - Autorun Manager
If you want to prevent apps from auto-running at every Windows startup or add new ones to the list, open the Tools menu to select Autorun Manager (or press Alt+A). This opens a new tab with a list of all autorun utilities. Right-click an object to open the context menu and Disable Auto Starting, Kill Process (if it's currently active) or Remove Selected (remove entries from the list and always keep them in the autorun sequence).
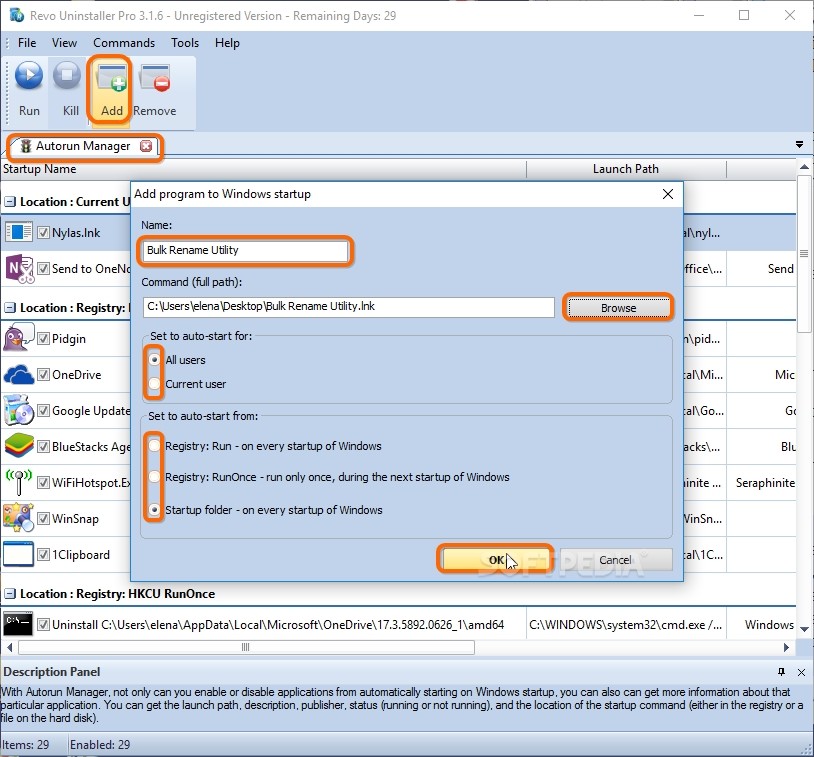
To add new apps, click the Add button from the toolbar, enter the display Name, click Browse to locate the program, Set the auto-start for All users or just the Current user, and place it in Registry: Run or Startup folder (runs at every Windows startup) or Registry: RunOnce (runs only once, at the next Windows startup). Click Ok for confirmation.
Tools - Junk Files Cleaner
If you want to find and remove various unnecessary files to free up space, open the Tools menu to select Junk Files Cleaner (or press Alt+J). By default, all drives are taken into account for the scanning operation, but you can speed up the task by excluding any partitions (clear their boxes). Alternatively, click the Scan Folder menu and use the tree view to locate a directory you want to scan while excluding anything else.
Click the Scan button on the toolbar to begin the search. Before rushing to remove everything (click Delete on the toolbar), you should review the list of file paths to make sure you won't be erasing items you actually need. All objects are auto-selected for deletion, but you can clear the boxes of the ones you wish to keep.
To customize the types of files recognized as junk by Revo Uninstaller Pro, open the Tools menu to choose Options (or press Alt+O), go to Junk Files Cleaner, deselect the file types you want to include in the cleaning operation, Add new ones by indicating the Pattern to scan for, and go to the Exclude tab to specify folders to exclude. Click Ok when you're ready.
Tools - Windows Tools and Browsers Cleaners
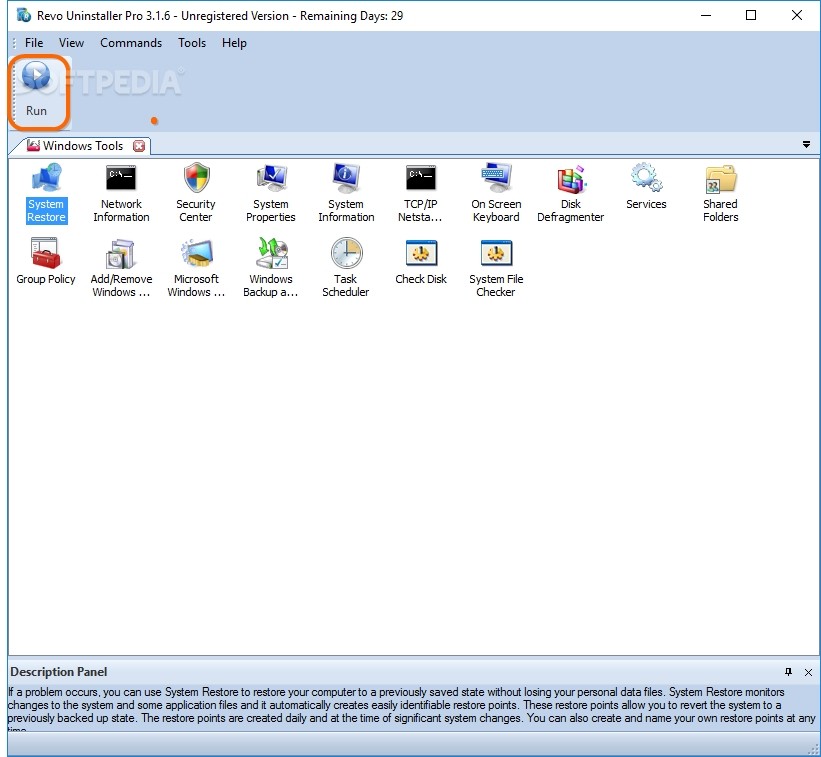
Shortcuts are provided to several Windows utilities, such as System Restore, Security Center, System Information, System Properties, On Screen Keyboard and Disk Defragmenter. To access it, open the Tools menu to select Windows Tools (or press Alt+T). Then you can select a tool and click Run on the toolbar.
If you want to protect your browsing privacy and free up some space, open the Tools menu to select Browsers Cleaners (or press Alt+R). This opens a new tab where your installed browsers are detected by Revo Uninstaller Pro, and you can check the boxes next to the type of content you want to clear.
For example, when it comes to Internet Explorer, you can Clear History of Visited Internet Web Pages, Delete Address Bar History, Delete Temporary Internet Files, Delete Cookies, and Delete Index.dat Files. After making the selection, click Clear on the toolbar, and Yes in the popup window for confirmation.
Tools - Microsoft Office Cleaner and Windows Cleaner
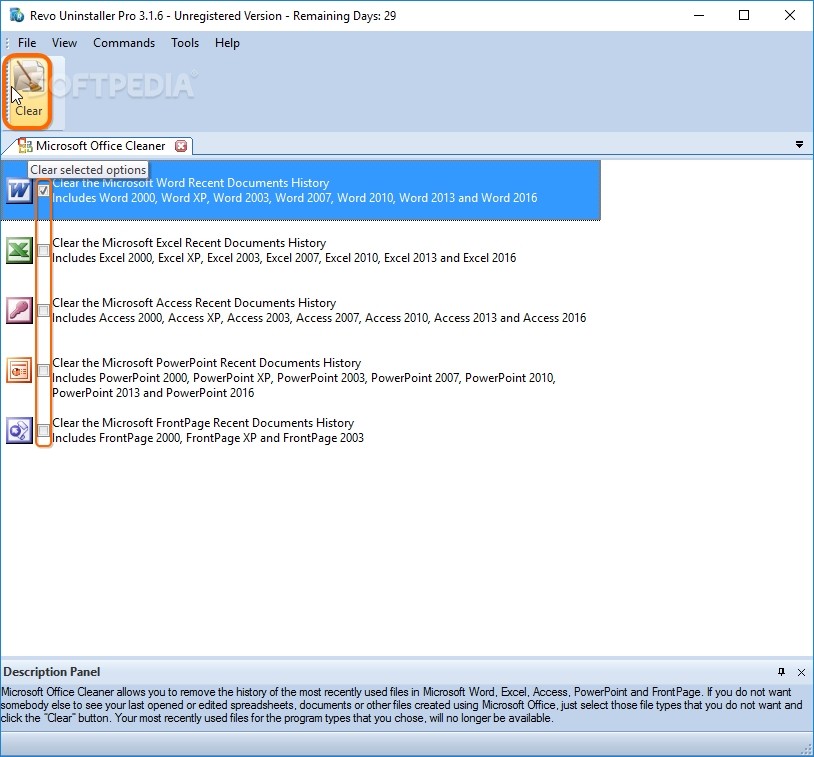
Similar to Browsers Cleaners, you can clear the history of recent documents loaded in Microsoft Office products, in order to protect your privacy when sharing the PC with other users. To do this, open the Tools menu to select Microsoft Office Cleaner (or press Alt+M), tick the checkboxes of the Recent Documents History you want to erase (Word, Excel, Access, PowerPoint, FrontPage), click the Clear button and Yes for confirmation.
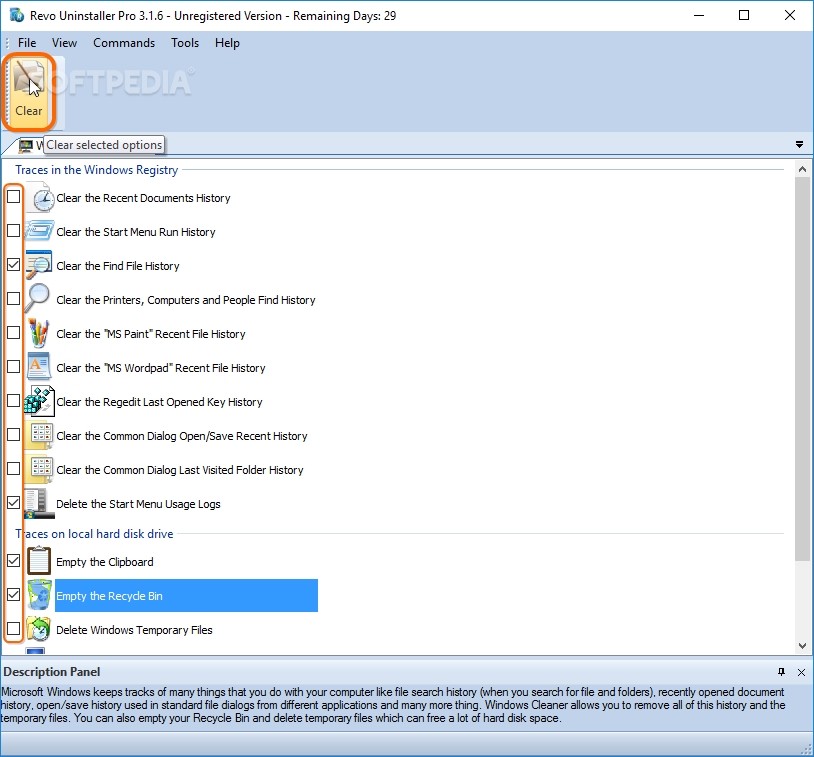
It's also possible to find and remove unneeded objects from the operating system to release some space. Open the Tools menu to select Windows Cleaner (or press Alt+W), tick the boxes of the objects you want to eliminate when it comes to Traces in the Windows Registry (like Clear the Find File History or Delete the Start Menu Usage Logs) and Traces on local hard disk drive (like Empty the Clipboard or Empty the Recycle Bin), click Clear on the toolbar and Yes for confirmation.
Tools - Evidence Remover and Unrecoverable Delete
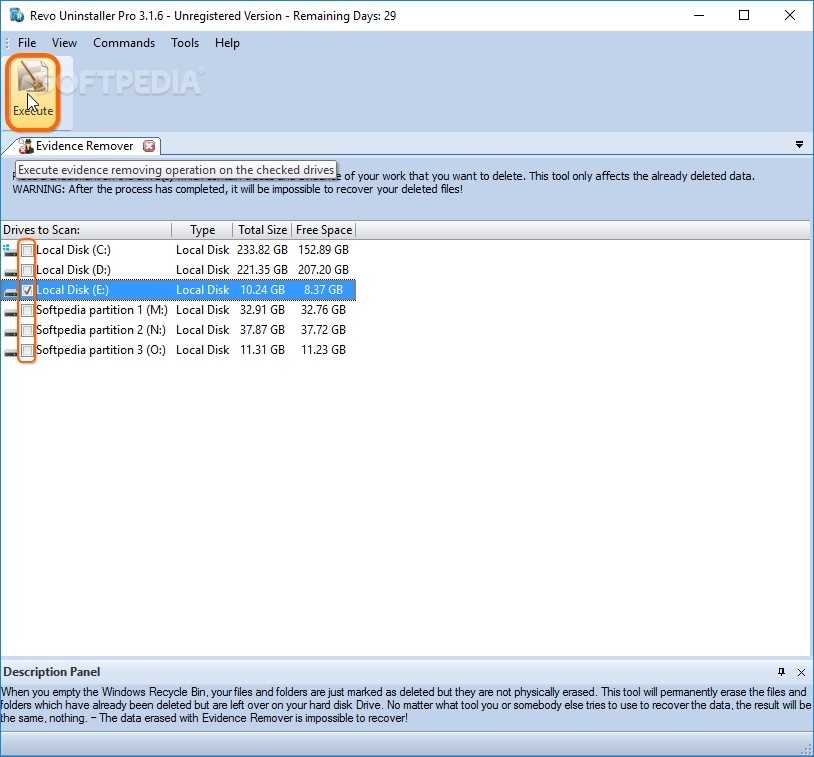
To secure free space and make sure that other people cannot recover already-deleted data using specialized software, open the Tools menu to pick Evidence Remover (or press Alt+E). All drives are auto-selected for this operation, but this can take a very long time (depending on the size of your hard drive). You can clear the boxes of any partitions you want to exclude from the job, and click Execute on the toolbar when you're ready to begin.
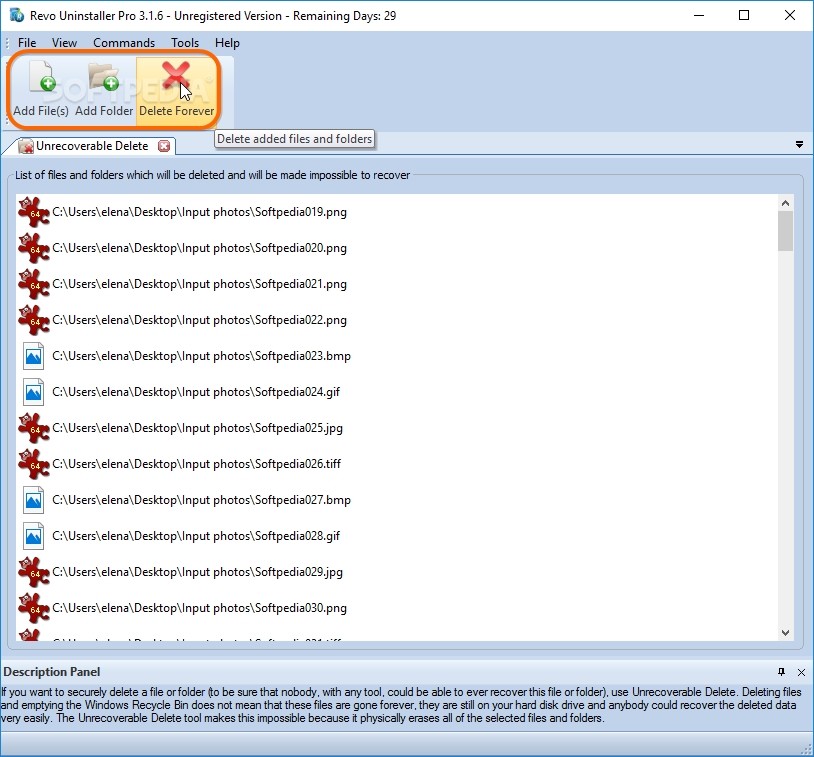
To shred files and folders and make sure they cannot be recovered by unauthorized users with specialized applications, open the Tools menu to choose Unrecoverable Delete (or press Alt+D), click the Add File(s) and Add Folder buttons on the toolbar to insert items, and click Delete Forever.
Tools - Backup Manager
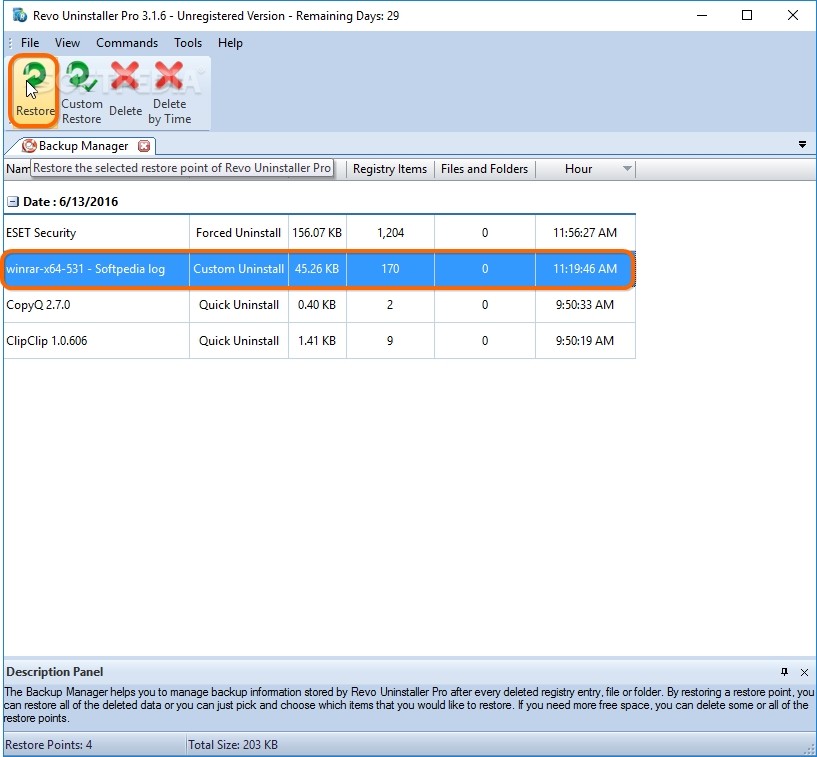
Revo Uninstaller Pro creates registry backups before every uninstall to give you the possibility of restoring Windows to the previous state in case you start experiencing stability issues after uninstall. To view the list of backups, open the Tools menu and pick Backup Manager (or press Alt+B).
You can view the Name of the uninstalled program, along with the type of Operation (like Custom Uninstall, Quick Uninstall or Forced Uninstall), program Size, number of Registry Items and Files and Folders, as well as the Hour of uninstall. Select an entry to click Restore from the toolbar if you want to revert Windows to the state before uninstalling the corresponding application.
To get a visual rundown of the advanced uninstaller, play our video guide below. You can also download Revo Uninstaller Pro (can be tested for free for 30 days, without any feature restrictions).
Revo Uninstaller Pro Explained: Usage, Video and Download
Use a professional tool for Windows to efficiently uninstall programs by getting rid of any leftovers, and remove various junk files. Check out our article for more info: http://www.softpedia.com/blog/revo-uninstaller-pro-explained-usage-video-and-download-505171.shtml