14 DAY TRIAL //
 Power users who work with many files daily can resort to software assistants that automate the file filtering process by taking into account the rules they specify. For example, instead of going through numerous files with photos, music, and movies to sort everything in the right folders, you can tell programs what to send where, saving you a lot of time and energy.
In this guide, we're breaking down three Windows applications made for auto-organizing files. Movit is free to use and the simplest of the three because it can only move files you add to the task list based on the file names and extensions. File Juggler is a commercial product that can monitor folders to auto-process files based on various criteria (such as timestamps, sizes or contents) and move, copy, rename, delete, sort, extract or upload them. DropIt can process all files you drop into a box placed on the desktop to copy, move, compress, extract, rename, delete, split, join, encrypt them, among other actions.
Movit
After firing up Movit, open the File menu and click Rules (or press R). In this window, click the + sign on the toolbar to Add a New Rule. This can be done by specifying a file Mask. For example, you can write *.* if you want to take into account all files, *.extension for all files matching a specific extension, ? to match a single arbitrary character from the file names, or [ ] to match a set of characters, such as all lowercase letters [a-z], only the first three letters of the alphabet [abc] or all numbers [1-9].
Next, click the folder button next to the Move to box to tell the application where you want to move the files that match the conditions. Click Ok to apply modifications. You can add as many rules as you want to cross-check, then drop files of various file extensions in the main window to automatically filter and move them to the corresponding destinations (click the Movit button on the toolbar to start). Files that don't match any rules are left untouched in their locations.
For example, you can configure the Movit to transfer audio tracks (*.mp3, *.wav, *.flac etc.) to a specific folder (Music), and images (*.jpg, *.bmp, *.png etc.) to another directory (Movies).
File Juggler
Several examples for creating file rules are displayed when firing up File Juggler. To create new ones, click Add, set the profile name in the Description box, click the ... button next to the Monitor box to indicate directories you want to monitor for new files to process (optionally Include subfolders).
You can set the conditions in the If area (if files match these conditions) by choosing between Any of the following (at least one condition must be true) and All of the following (all conditions must be true). For example, you can only include or only exclude files with a specific name (Is or Is not) or partial name (Contains or Does not contain), as well as include files only if the File name Matches the regular expression you specify.
Similar rules can be applied to File extensions. Additionally, you can include or exclude File Types (Is or Is Not Audio, Compressed, Document, Image, Video, Disk image), limit the File Size (Larger than or Smaller than, set the value in Bytes, Kb, Mb or Gb), as well as limit the age (File Created, File Modified, File Accessed Less Than or More Than, set the number of Minutes, Hours, Days, Weeks or Months).
You can set as many conditions as you want. Afterward, go to the Then section below to tell File Juggler what to do when detecting files that match the rules. Click the + sign and the menu to choose the command between Move file and Copy file (click ... to set the destination and Insert to apply file rename patterns).
Moreover, you can Rename file (click Insert to apply file rename patterns), Send to recycle bin, Delete file, Sort in folders (by file type, month or day, then click the ... button to set the destination directory), Run command (set the command line), Extract files (if they are compressed in archives), Upload with Evernote, or just Notify me. You can set as many actions as you want, then click Save and close when you're done.
DropIt
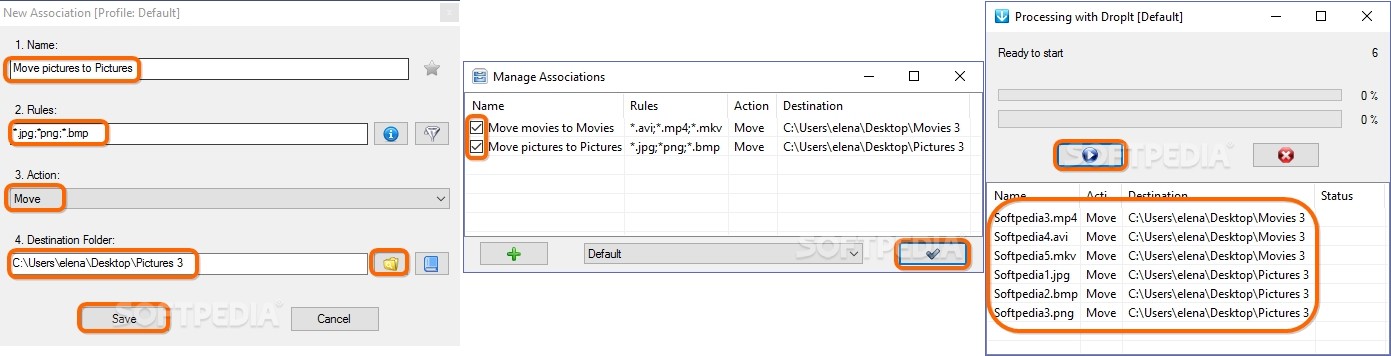
Once launched, DropIt shows a small, blue dropbox on the screen that stays on top of other windows and can be moved anywhere. All files or folders you drop in this box will be processed by the tool. However, you must first define rules. To do this, right-click the dropbox and select Associations.
In the Manage Associations window, click the + sign to create a profile. You can set a profile name and click the star icon next to it to mark it as favorite (in case of multiple matches, this profile will have priority).
When it comes to conditions, you can type in the Rules box: * for all files, # for all files without other matches, ** for all folders, ## for all folders without any matches, *.extension for all files with a specific extension, word* for all files whose names begin with word, full paths for files from specific directories, and so on. Click the first button next to the Rules box to view more Rule examples for files and folders.
Click the second button next to the Rules box to bring up the Additional Filters window and tick the boxes of the file Properties or Attributes you want to take into account when dropping files into the box. For example, you can ask DropIt to process only files larger, smaller or with an exact size. To do this, tick the Size box, click the menu to select the larger than (>), smaller than (<), or equal to (=) sign, then set the value and measurement unit (bytes, KB, MB or GB).
Ticking a box means that only one filter will be applied to the files. But you can assign more so that files are not only matched in size but also in age (Date Created, Date Modified, Date Opened) and Attributes (Archive, Hidden, Read-Only, System, Temporary, tick a box and then the menu to select Attribute On).
To further narrow down the list of files, you can filter them by name or type (tick the Included Files box and write the names or types) as well as File Content: Literal string (case sensitive or insensitive, write the exact words included in the file contents, applies only for text documents), At least one of the words (case sensitive or insensitive), All words in casual order (case sensitive or insensitive). Click Ok when you're done setting all filters.
Next, you can specify the course of Action to take when dropping files that match the rules. Click the Action menu to choose from Move and Copy (set the destination folder and file renaming pattern), Compress (set the destination folder, file naming pattern, ZIP, 7Z or EXE compression type, level, method, encryption and password), Extract from archive (set the destination folder), Rename (set the file renaming abbreviations) or Delete (send to Recycle Bin, directly remove from the PC or safely erase to make data unrecoverable).
More actions are available: Split (set the split size and measurement unit), Join (only by dropping parts of a previously split file to reconstruct the original item), Encrypt or Decrypt (set the password and 3DES, AES-128, AES-192, AES-256, DES, RC2 or RC4 algorithm), Open With (select the program to open files with, ideal for files with extensions unrecognized by Windows), Upload (via FTP, SFTP or SFTP, set the host, port, username and password) or Send By Email (via SMTP, set the SMTP server and port, SSL, your name, email address, username password, attachment size limit, receiver, Cc, Bcc, subject and body).
The remaining actions available are: Create Gallery (select the theme and photo quality), Create List (set the list contents and style), Create Playlist, Create Shortcut, Copy to Clipboard (click the button next to the Clipboard Text box to choose what file information to copy, like selecting the abbreviations for file renaming), Change Properties (choose what to change between timestamps and attributes), and Ignore.
You can create multiple profiles, activate or deactivate any of them, as well as turn on Folder Monitoring to auto-process files from specific directories. To do this, right-click the DropIt box, select Options, go to the Monitoring tab, tick the Enable scan of monitored folders box, set the Time interval in seconds and Minimum size in KB, then click Add to add as many folders as you want.
Play our video guide below to see how these three apps work. You can also download Movit, File Juggler and DropIt from Softpedia.
Work More Efficiently with Files by Creating an Automated Workflow
Power users who work with many files daily can resort to software assistants that automate the file filtering process by taking into account the rules you specify. Play this video to find out how to move pictures and videos to corresponding folders using three apps. Check out our article for more info: http://www.softpedia.com/blog/work-more-efficiently-with-files-by-creating-an-automated-workflow-505993.shtml